

How to Set Up & Use Windscribe on a Router (OpenVPN WireGuard)


Overview
Installing Windscribe on your router routes internet traffic through the VPN for devices assigned to the VPN profile: phones, smart TVs, game consoles, and others that connect through it. On routers with an apply-to-all option, this may cover most devices on the primary network depending on your router, with the exceptions below. This is particularly useful for devices that cannot run a VPN app natively, and means you configure the connection once rather than on each device individually.
Heads up: router VPN is useful, but it is not a magic invisibility blanket for your entire network. Devices on guest networks or secondary access points, local LAN traffic between devices on the same router, the router's own background services, and any device running its own separate VPN or proxy will not route through the tunnel automatically. IPv6 traffic may also bypass the tunnel depending on your router and config settings.
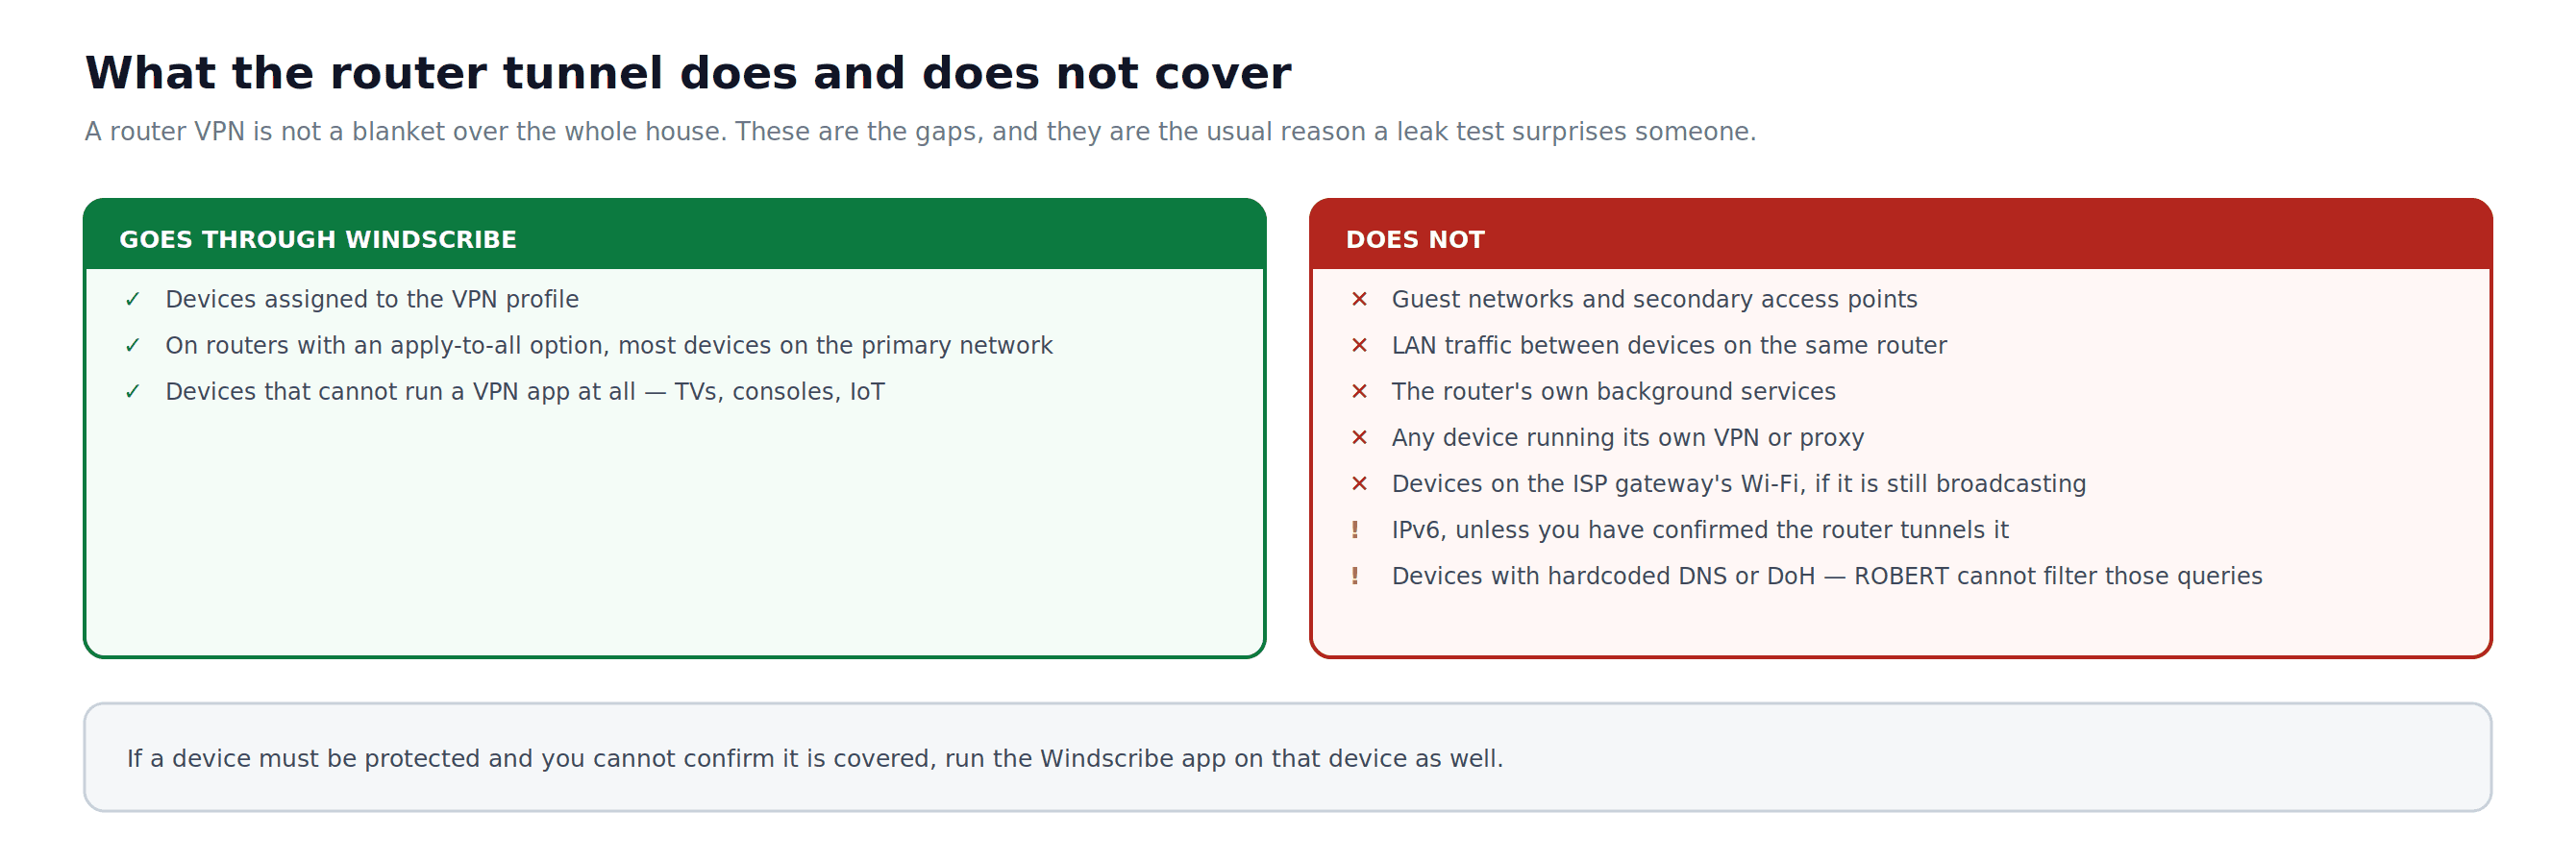
Figure 1: What a router-level tunnel covers, and the gaps that catch people out on a leak test.
Note: This guide covers stock (OEM) firmware only. If your router runs DD-WRT, OpenWrt, or Tomato/FreshTomato, consult Windscribe's firmware-specific guides in the Knowledge Base.
GL.iNet note: GL.iNet stock firmware is built on OpenWrt but uses GL.iNet's own router interface. If you are using GL.iNet's standard firmware, follow the GL.iNet steps in this guide rather than the generic OpenWrt guide. GL.iNet routers commonly use 192.168.8.1 for the admin panel.
WireGuard® support on stock firmware is limited to certain newer models. Before starting Part 2, confirm that your router's current firmware includes a native WireGuard client feature.
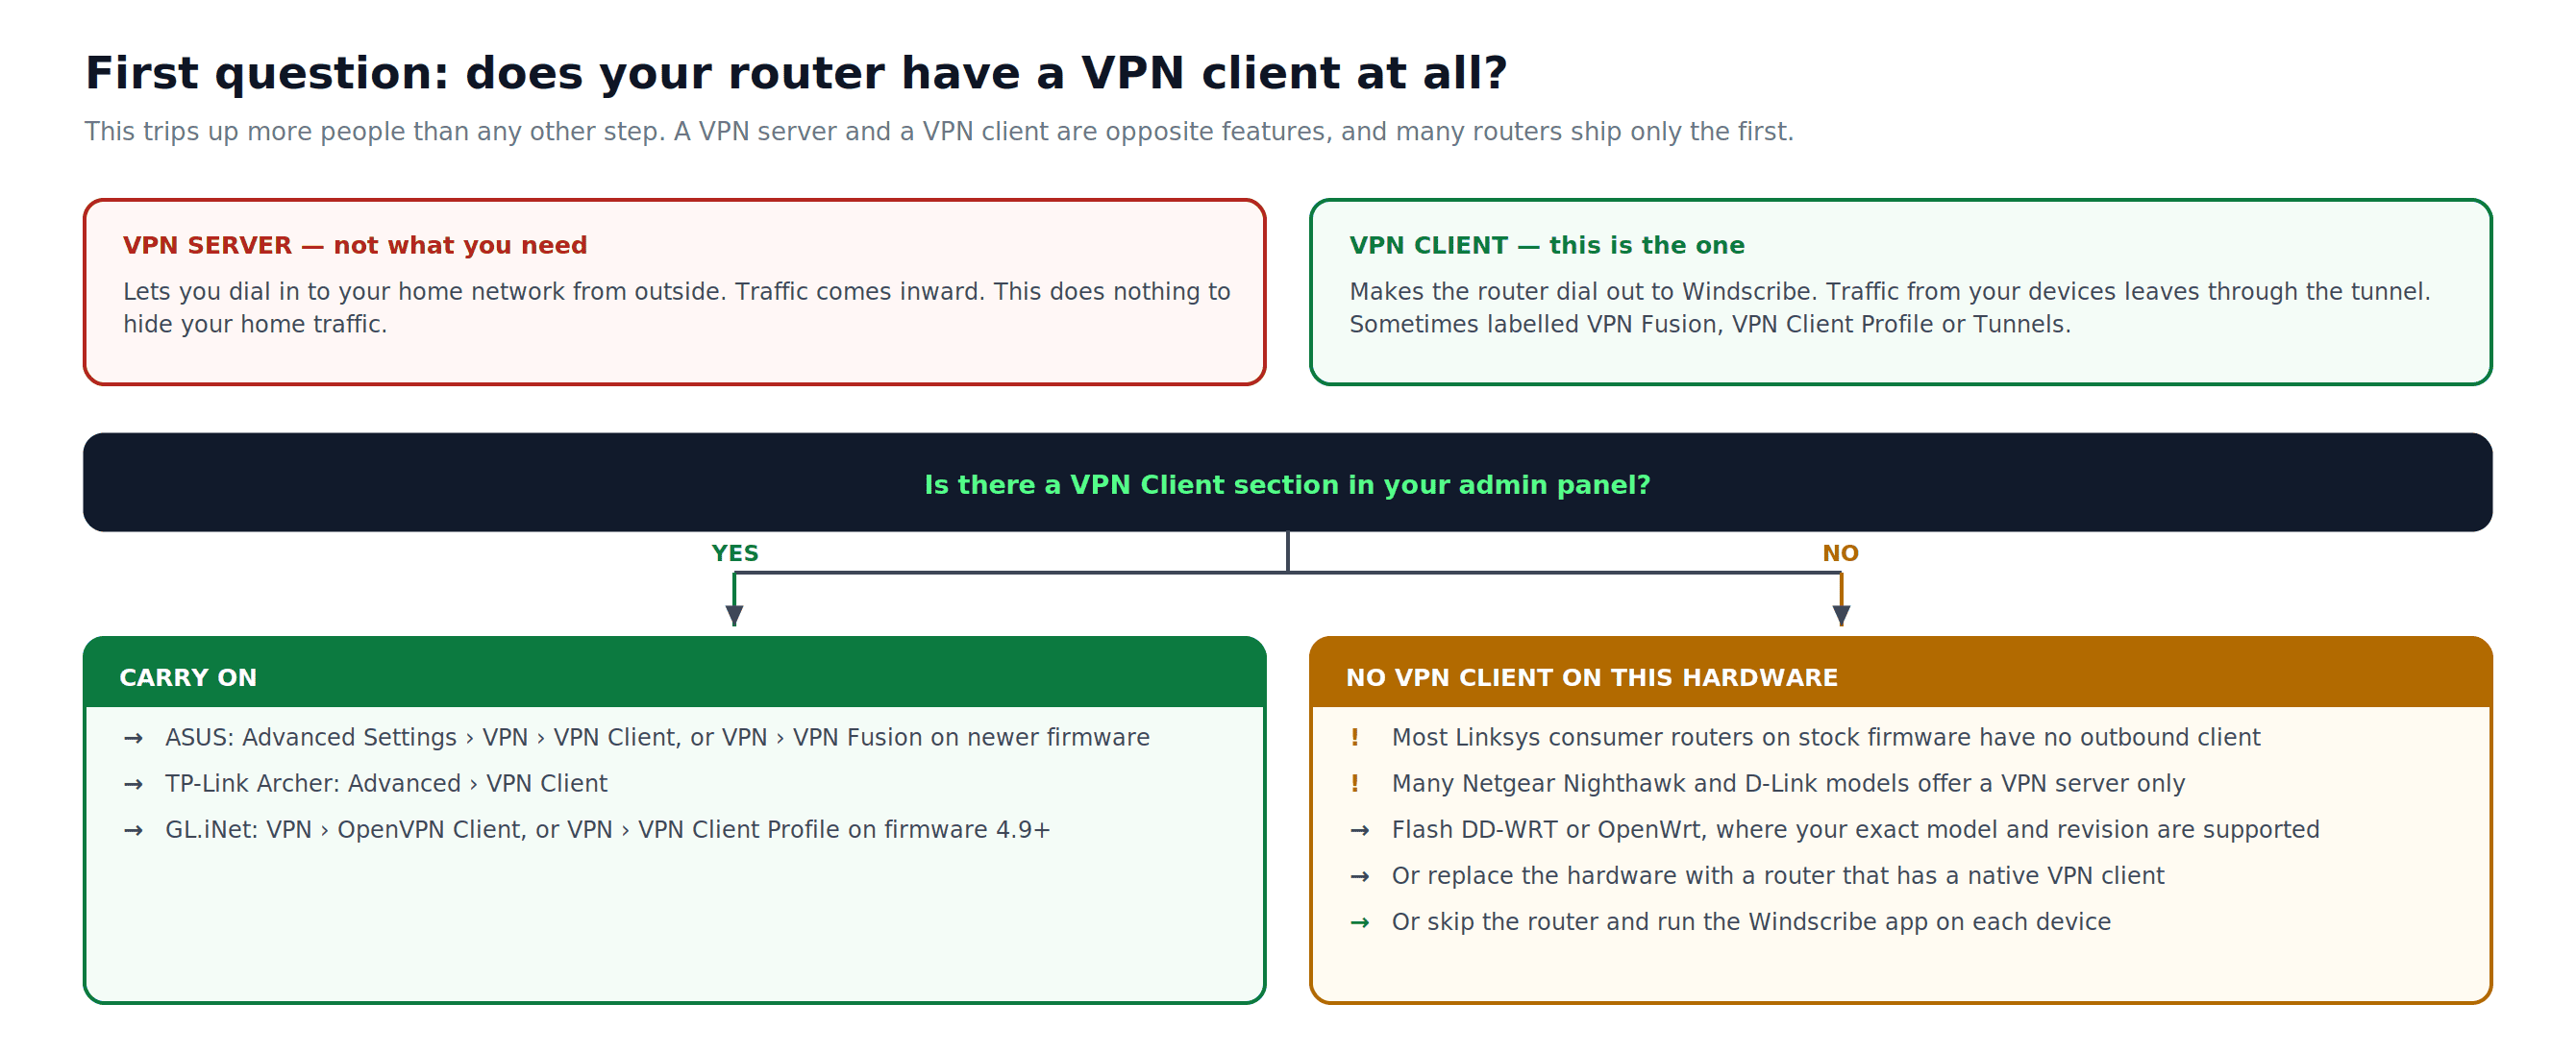
Figure 2: A VPN server and a VPN client are opposite features. Confirming which one your router has is the first real step.
Prerequisites
- A Windscribe Pro or Build-A-Plan paid subscription, required to access the Config Generator and download config files
- Access to your router's admin panel, typically at
192.168.1.1or192.168.0.1 - Your router admin credentials, usually an admin password, or an app or cloud account on systems like TP-Link Deco
- A computer or phone connected to the router via Ethernet or Wi-Fi
- Important: router configs do not get Windscribe's app Firewall. If the tunnel drops and your router has no kill switch, it may happily send traffic through your ISP like nothing happened. Check your router's VPN client settings for a Block traffic if VPN disconnects or equivalent kill switch option and enable it before relying on this setup for privacy. Many stock router firmwares do not include a true kill switch. If your router does not offer one and you need fail-closed protection, use the Windscribe app on individual devices instead.
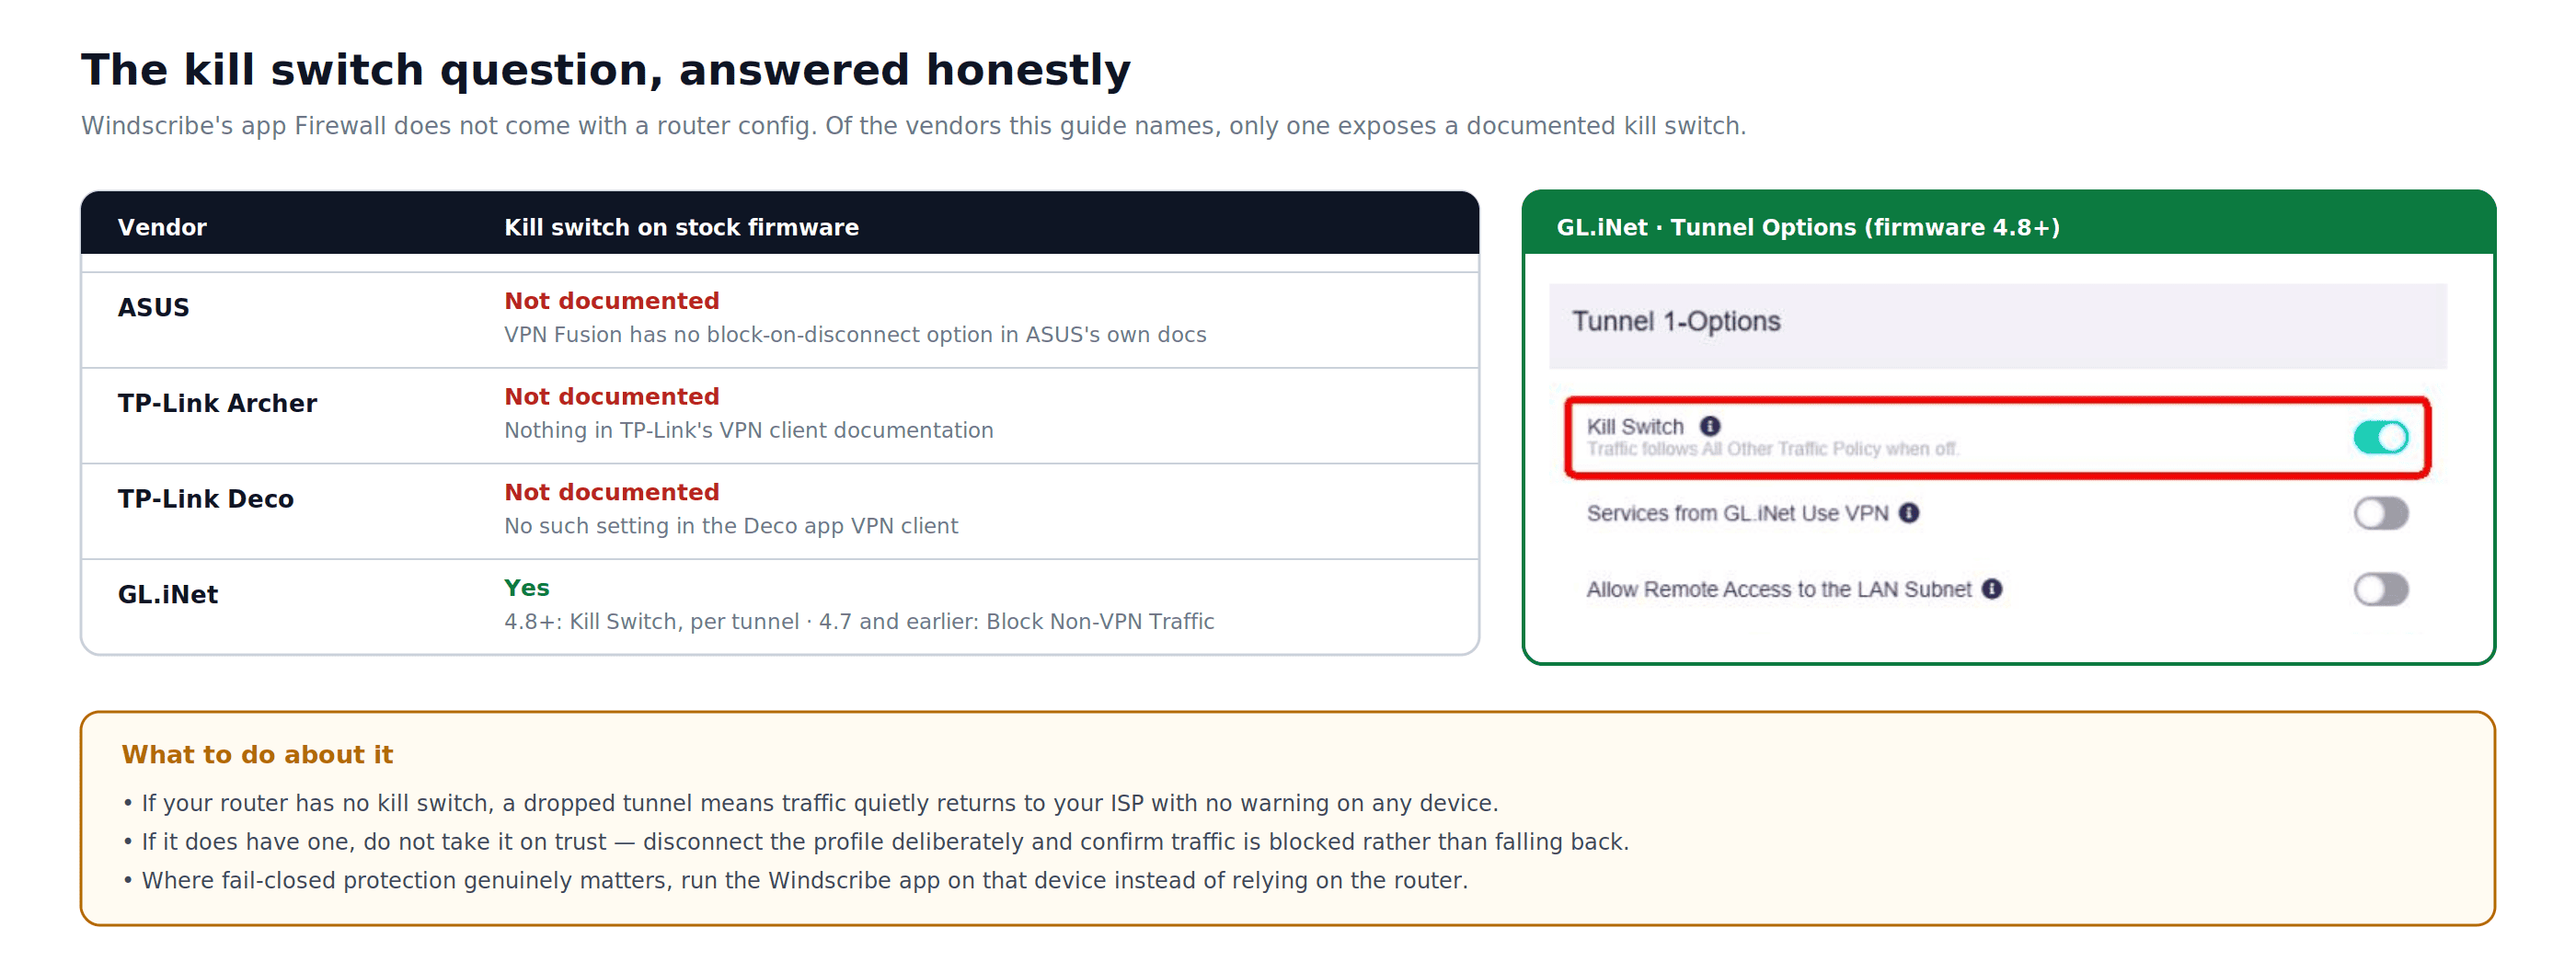
Figure 3: Kill switch availability on stock firmware, checked against each vendor's own documentation.
Before you begin: Back up your router's current settings using the export or backup option in the admin panel. Make all changes while connected to the router locally, via Ethernet or Wi-Fi, so you can disable the VPN profile and restore internet access without needing a remote connection if something goes wrong.
Part 1: OpenVPN Setup
Step 1: Download Your OpenVPN Config File
- Open the Windscribe OpenVPN Config Generator and sign in.
- Select a Location / IP from the dropdown.
- Choose a Protocol: UDP is recommended for speed; TCP can be more reliable on unstable or restricted connections.
- Select a Port. Use 443 if you are unsure.
- Select the OpenVPN Version your router supports. If you are unsure, use the generator's compatibility guidance and your router's documentation.
- Click Download Config and save the
.ovpnfile to your computer. - Click Get Credentials. Copy the OpenVPN username and password shown. These are separate from your main Windscribe account login.
Step 2: Access Your Router's Admin Panel
- Open a browser on a device connected to your router.
- Enter your router's gateway IP in the address bar. Common examples are
192.168.1.1,192.168.0.1, and192.168.8.1for many GL.iNet routers. Check the label on the underside of your router if you are unsure. - Log in with your router admin credentials.
Step 3: Locate the VPN Client Section
Navigation paths vary by manufacturer and firmware version. The following are approximate starting points that may differ by model:
- ASUS: Advanced Settings > VPN > VPN Client, or VPN > VPN Fusion > Add Profile > OpenVPN on newer firmware with VPN Fusion
- TP-Link Archer: Advanced > VPN Client
- GL.iNet: VPN > OpenVPN Client, or VPN > VPN Client Profile on firmware 4.9 and later
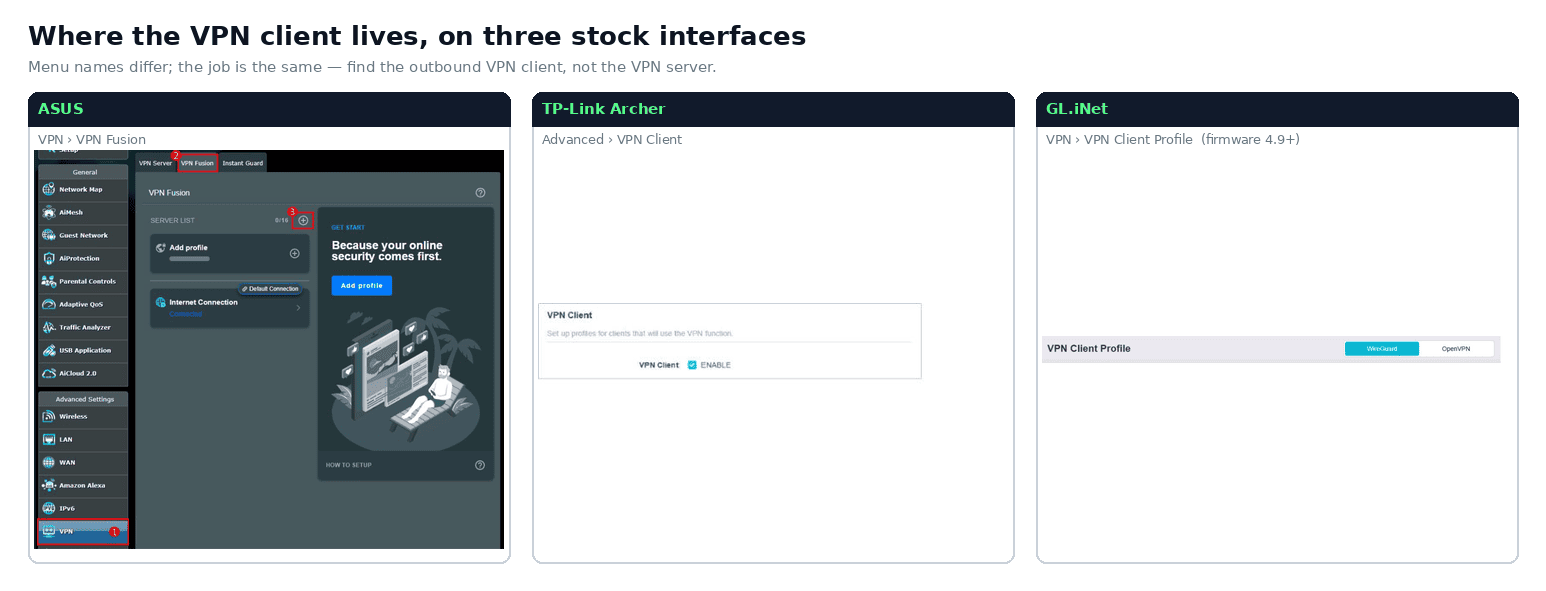
Figure 4: The VPN client section on three stock interfaces. Screenshots: ASUS, TP-Link, GL.iNet.
Important: Many routers with stock firmware do not support outbound VPN client connections. Most Linksys consumer routers on stock firmware do not include an outbound VPN client. Check your exact model's feature list before proceeding. Many consumer Netgear Nighthawk and D-Link routers only provide a VPN server feature for remote access back into the home network and cannot connect outward to an external VPN service. If your router has no VPN Client section, your options are to flash DD-WRT or OpenWrt where supported by your exact model and hardware revision, or to replace the hardware with a router that includes native VPN client functionality.
Step 4: Add a New OpenVPN Profile
- Click Add Profile or the equivalent button in the VPN Client section.
- Select OpenVPN as the VPN type.
- Import the
.ovpnfile you downloaded from Windscribe:- Most interfaces provide an Import or Browse button to upload the file directly.
- Some older interfaces require pasting the full contents of the
.ovpnfile into a text field.
- Enter your Windscribe OpenVPN username and password from the Config Generator, not your main Windscribe account login. The visible
adminvalue in the ASUS vendor example below is sample interface data, not a Windscribe credential.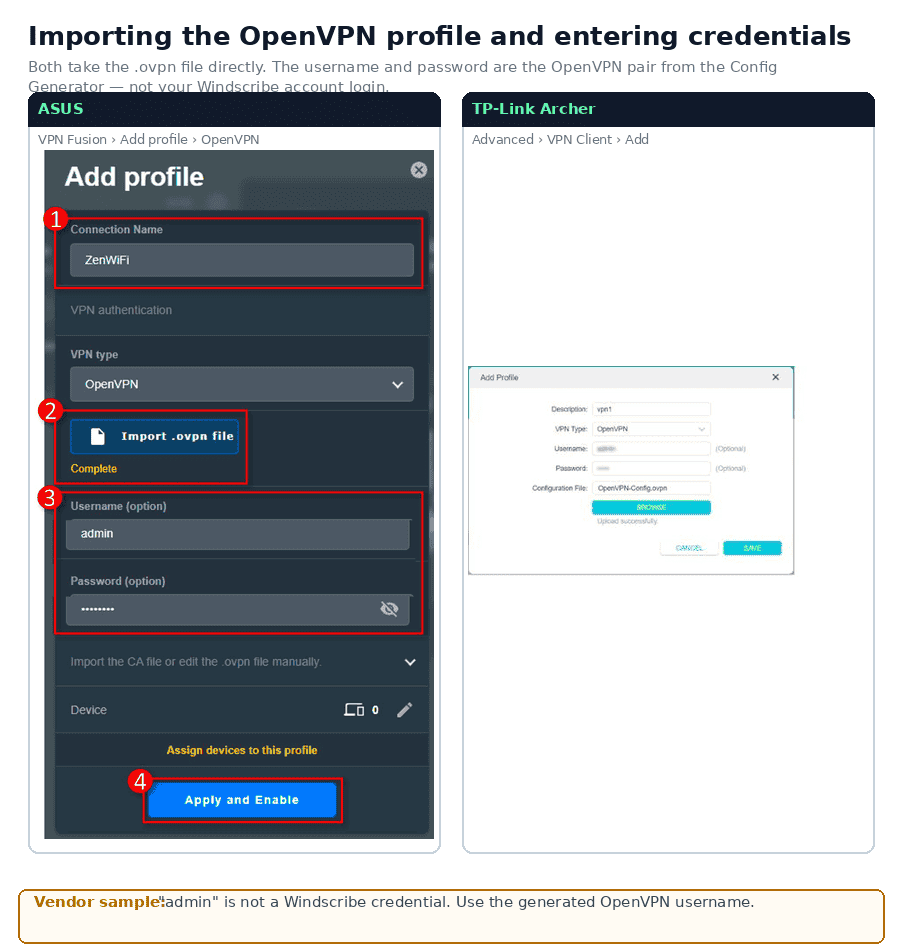
Figure 5: Importing the
.ovpnfile and locating the OpenVPN credential fields. The ASUS screenshot contains vendor sample values; use only the generated Windscribe OpenVPN credentials. Screenshots: ASUS, TP-Link. - Save or apply the profile.
Step 5: Activate the OpenVPN Connection
- In the VPN Client list, find the profile you created.
- Click Connect or toggle it on.
- Wait for the status to change to Connected or Active. A Connecting state is not yet a working tunnel.
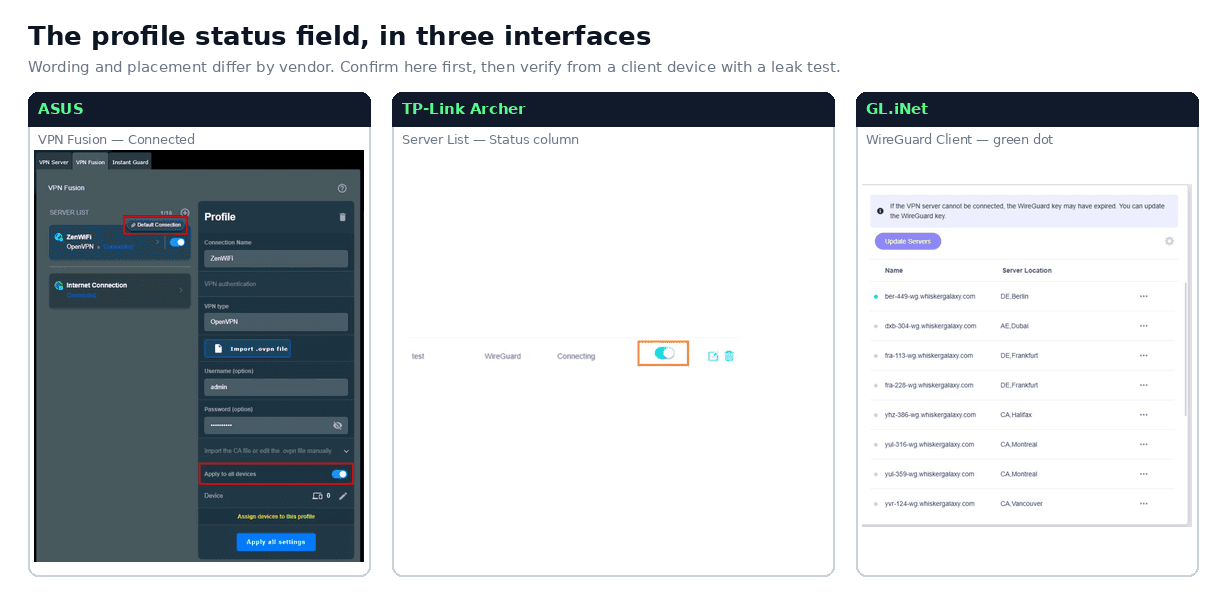
Figure 6: Where three stock interfaces show profile status. ASUS reports Connected; TP-Link reports Connecting; GL.iNet shows a green status dot. Verify the actual tunnel from a client device as described below. Screenshots: ASUS, TP-Link, GL.iNet.
IPv6 note: If your ISP provides IPv6, do not assume OpenVPN on stock router firmware handles it. Disable IPv6 on the router or WAN settings, or verify on ipleak.net or test-ipv6.com that no ISP IPv6 address appears while connected.
Part 2: WireGuard Setup
Compatibility Check
WireGuard client support in stock firmware is available on select models only. Common examples, depending on model and firmware, include:
- ASUS: Supported ASUS models with recent firmware and VPN Fusion support. Confirm your model against the ASUS WireGuard VPN Client in VPN Fusion support article.
- GL.iNet: Most current GL.iNet models include WireGuard client support in stock firmware, but confirm it for your exact model.
- TP-Link Archer: Select models and firmware versions only. Check your specific model and hardware revision's release notes to confirm WireGuard client support before proceeding.
- TP-Link Deco: Select models and firmware versions only, configured through the Deco mobile app rather than the router's web admin panel. Check your specific model and hardware revision's release notes to confirm support.
Verify support in your router's release notes or manufacturer's feature list before proceeding.
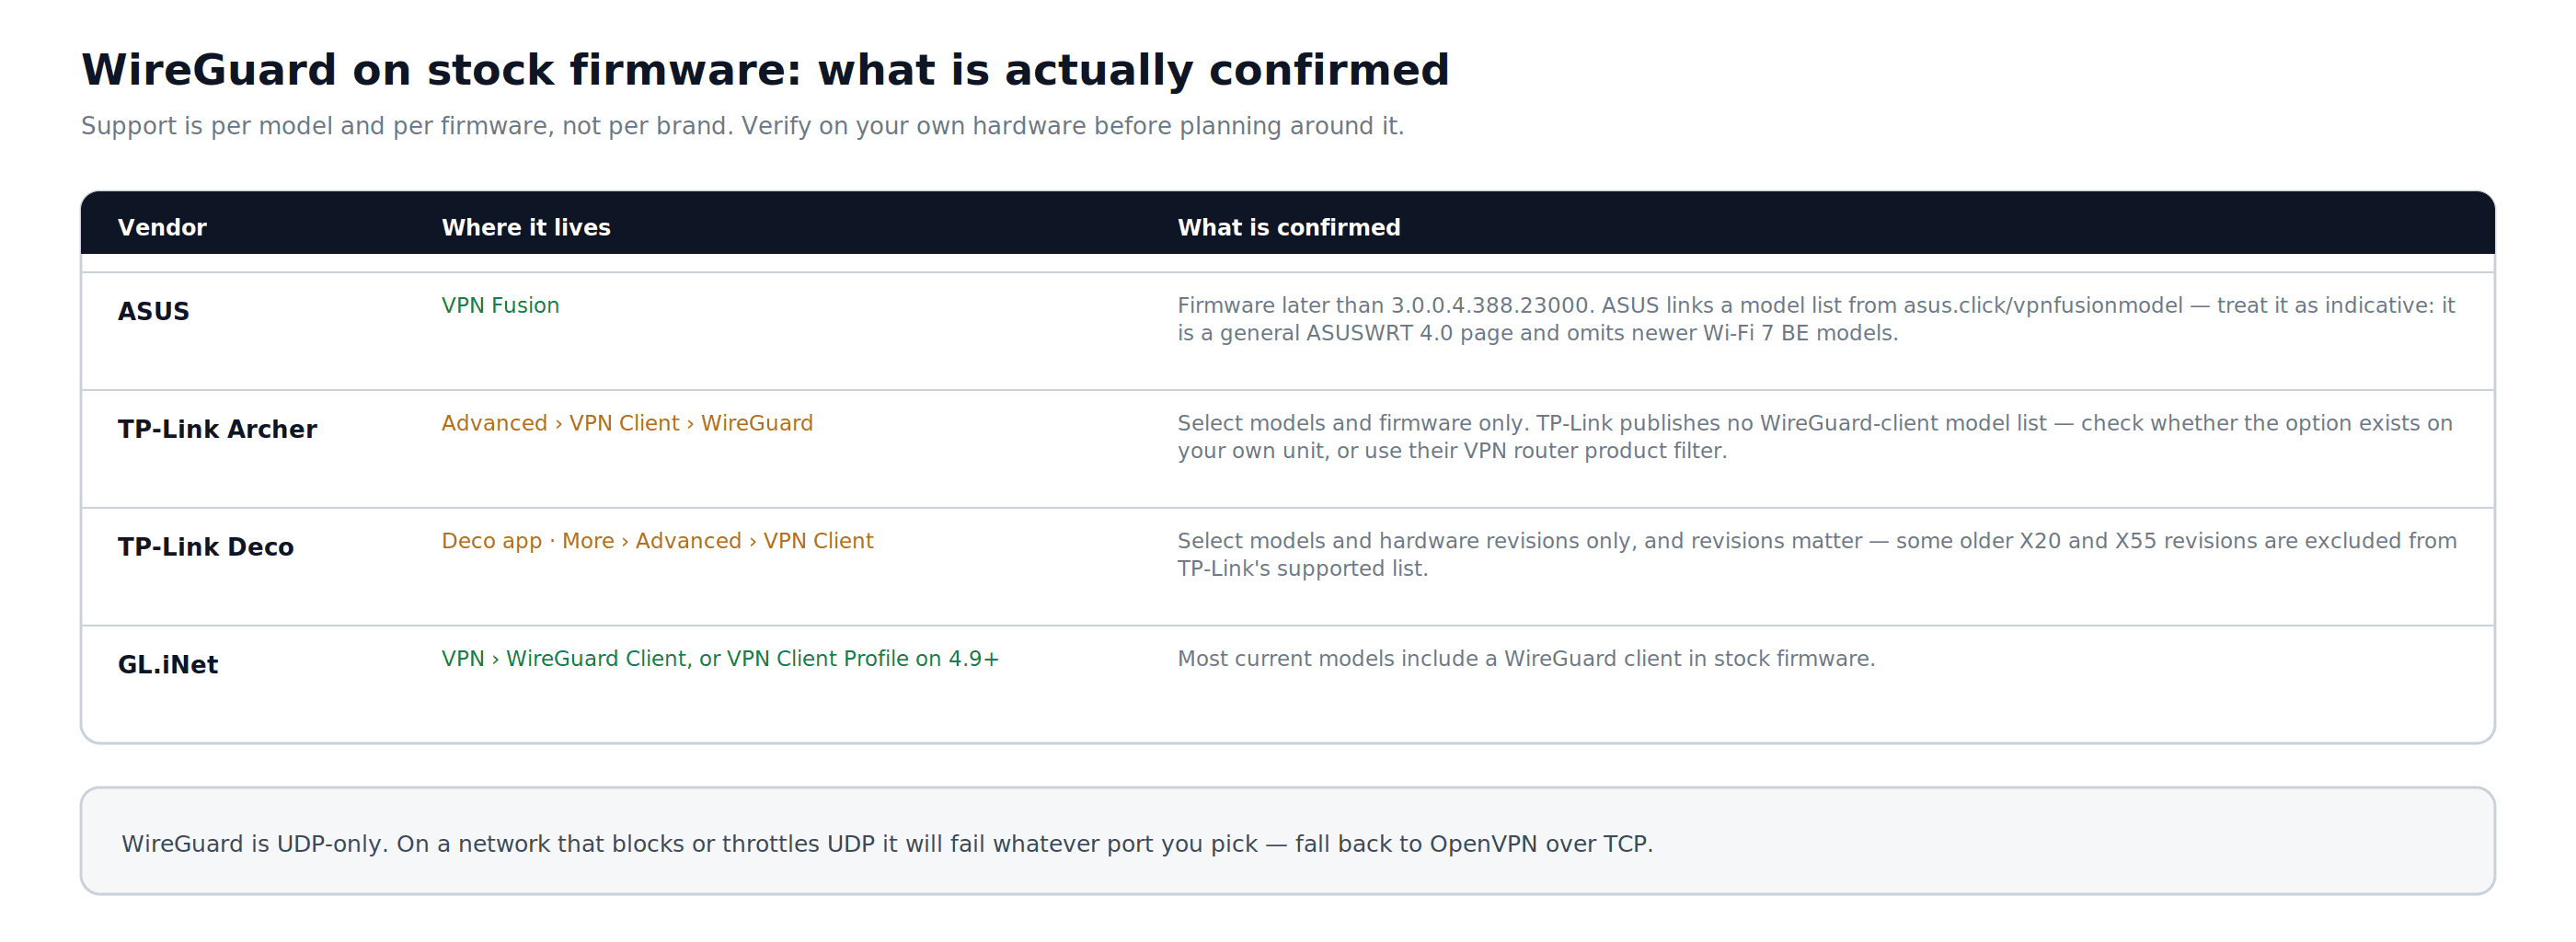
Figure 7: Where WireGuard support is confirmed on stock firmware, and how far each vendor's own list can be trusted.
Step 1: Generate a WireGuard Config
- Open the Windscribe WireGuard Config Generator and sign in.
- Select a Location from the dropdown.
- Select a Port. Use 443 if you are unsure. WireGuard uses UDP, so networks that block or throttle UDP may still block the connection regardless of port.
- Under Key Pair, keep New Key Pair selected or choose an existing key pair you generated previously.
- Click Download Config and save the
.conffile.
The file contains your private key, the server's public key, the preshared key, endpoint, routes, interface addresses, and DNS settings. Do not share this file or store it in an unsecured location.
Step 2: Access Your Router's Admin Panel or App
- For ASUS, TP-Link Archer, and GL.iNet routers, follow the same browser-based steps as Part 1, Step 2.
- For TP-Link Deco routers, open the Deco app on your phone and log in to your TP-Link account.
Step 3: Locate the WireGuard Client Section
- ASUS, supported models: VPN > VPN Fusion > Add Profile > WireGuard
- GL.iNet: VPN > WireGuard Client, or VPN > VPN Client Profile on firmware 4.9 and later
- TP-Link Archer, supported models: Advanced > VPN Client > WireGuard tab
- TP-Link Deco, supported models in the Deco app: More > Advanced > VPN Client > Add Profile > WireGuard, then import the config
Menu labels may vary by model and firmware version.
Step 4: Import the WireGuard Config
- In the WireGuard client section, click Add Profile, Import, or the equivalent option, then upload the
.conffile downloaded from Windscribe.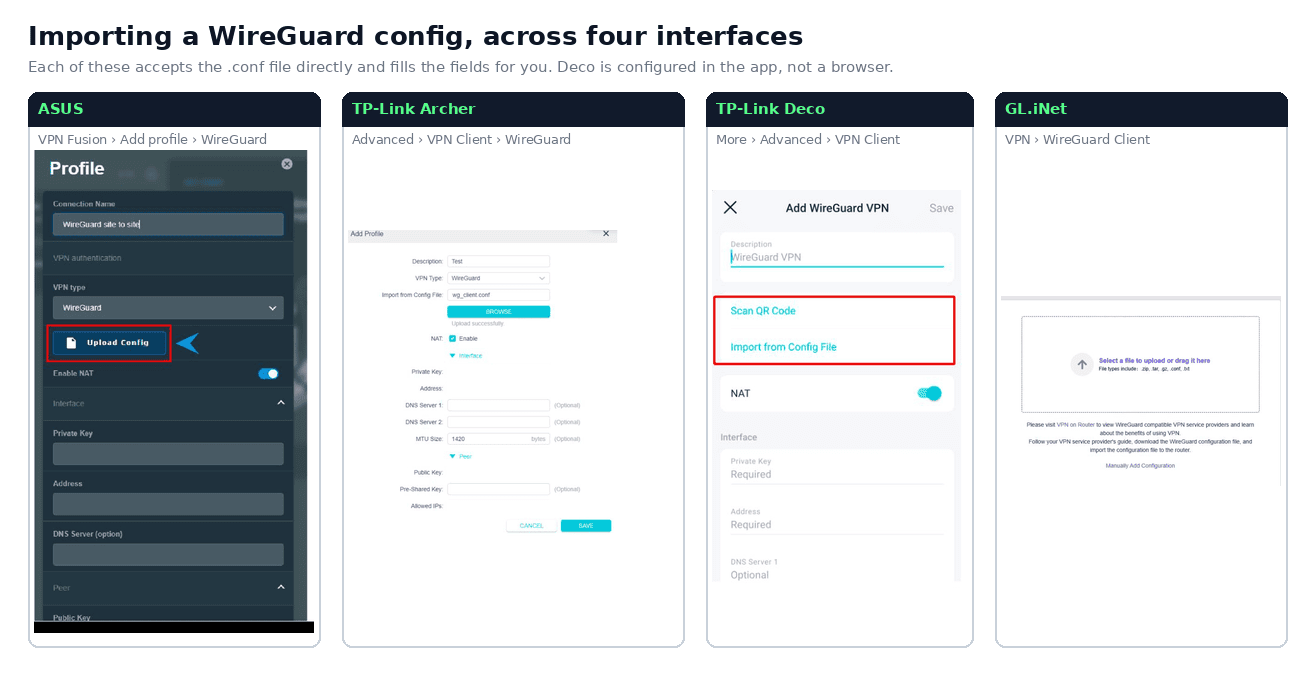
Figure 8: Importing a WireGuard
.confin four interfaces, including the Deco app. Populated key and tunnel-address values in the TP-Link Archer example are redacted. Screenshots: ASUS, TP-Link, GL.iNet. - Most routers will populate the fields automatically from the
.conffile. If yours requires manual entry, match every value from the downloaded config:- Private Key: your client key from
PrivateKey - Address: the generated IPv4 address and optional IPv6 address from
Address - DNS: the generated Windscribe DNS value from
DNS - Public Key: the Windscribe server key from
PublicKey - Preshared Key: the separate required value from
PresharedKey - Allowed IPs: keep the complete value from
AllowedIPsexactly as generated. Do not add, remove, or narrow routes. - Endpoint: the server address and port from
Endpoint
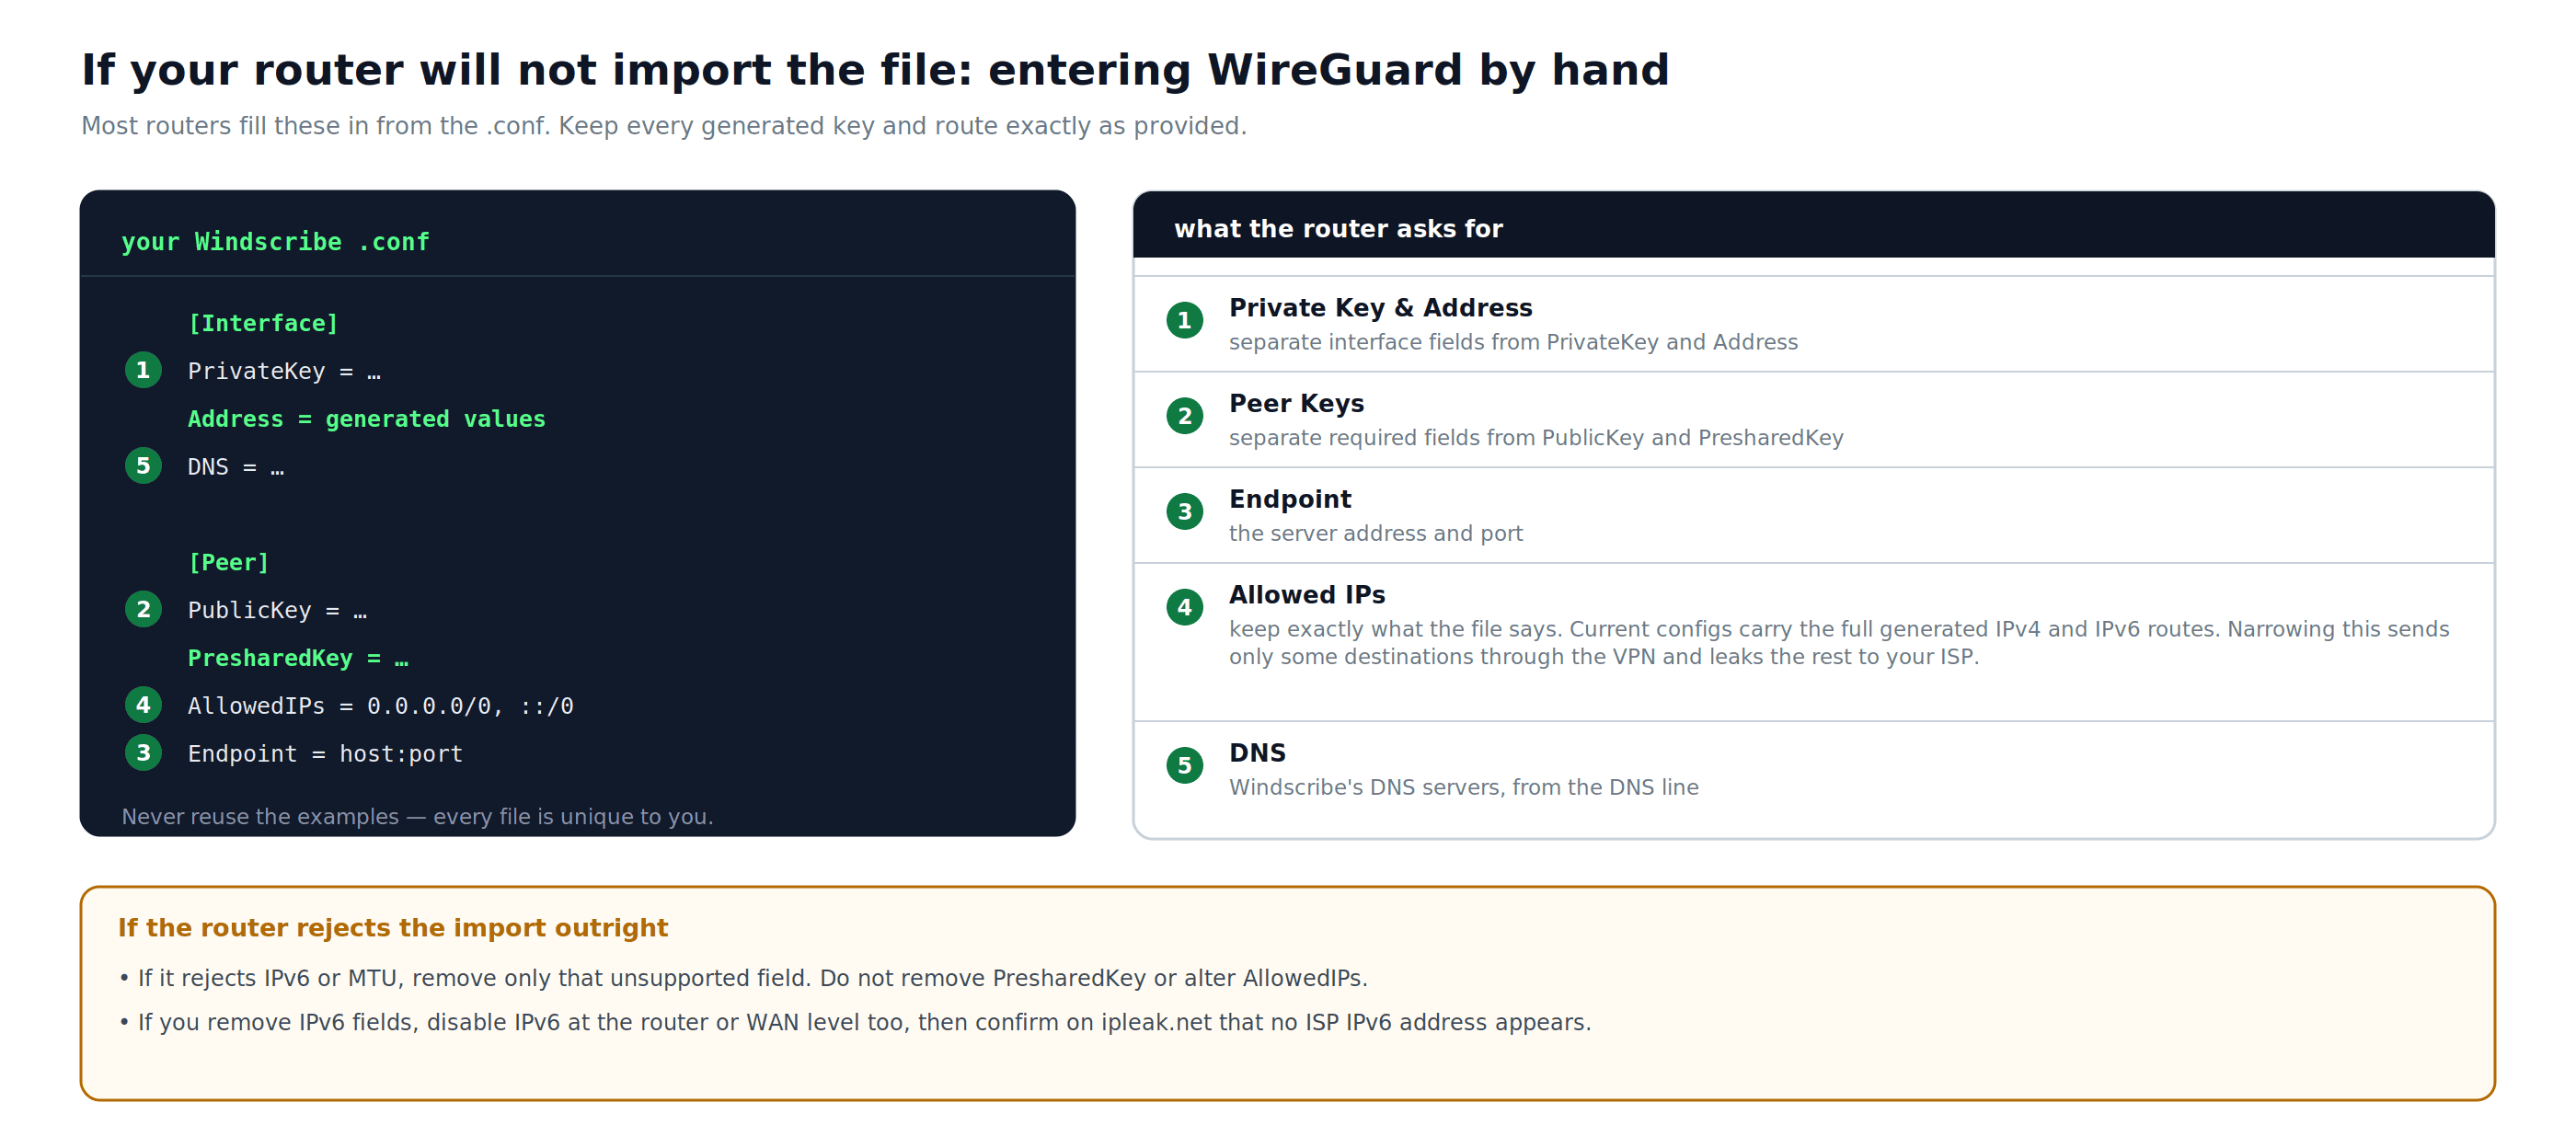
Figure 9: The fields a router asks for if it cannot import the file. Keep every generated key and route exactly as provided.
If the router rejects an IPv6 address or MTU line, remove only the field the exact firmware documents as unsupported. Do not remove
PresharedKeyor alterAllowedIPs. If you remove IPv6 fields, disable IPv6 at the router or WAN level and verify on ipleak.net that no ISP IPv6 address appears. - Private Key: your client key from
- Save the configuration.
Step 5: Activate the WireGuard Connection
- Select the profile you imported.
- Click Connect or toggle it on.
- Wait for the status indicator to show Connected or Active.
Device Assignment
Some routers let you choose which devices use each VPN profile. If your router has device assignment, VPN Fusion, policy routing, or an apply to clients option, make sure the profile is applied to every device you want routed through Windscribe before verifying the connection.
Verifying the Connection
After activating either protocol, verify the tunnel from a device behind the router:
- Open Windscribe's What Is My IP page or ipleak.net. Confirm the public address is a VPN exit rather than your regular ISP address. Geolocation labels can differ between databases, so the city name alone is not proof.
- On ipleak.net, check DNS. The expected result is Windscribe's DNS, which may not use the same IP or city label as the VPN exit. Your ISP's resolvers or an unexpected third-party resolver need review.
- Check IPv6 separately. A safely tunneled VPN IPv6 address is acceptable; your ISP-assigned IPv6 address is a leak. If the router cannot tunnel the generated IPv6 route, disable IPv6 on the router or WAN and test again.
If your ISP address or unexpected DNS resolvers are still visible, disconnect the VPN profile, reconnect, and recheck. If the problem persists, review the configuration for input errors.
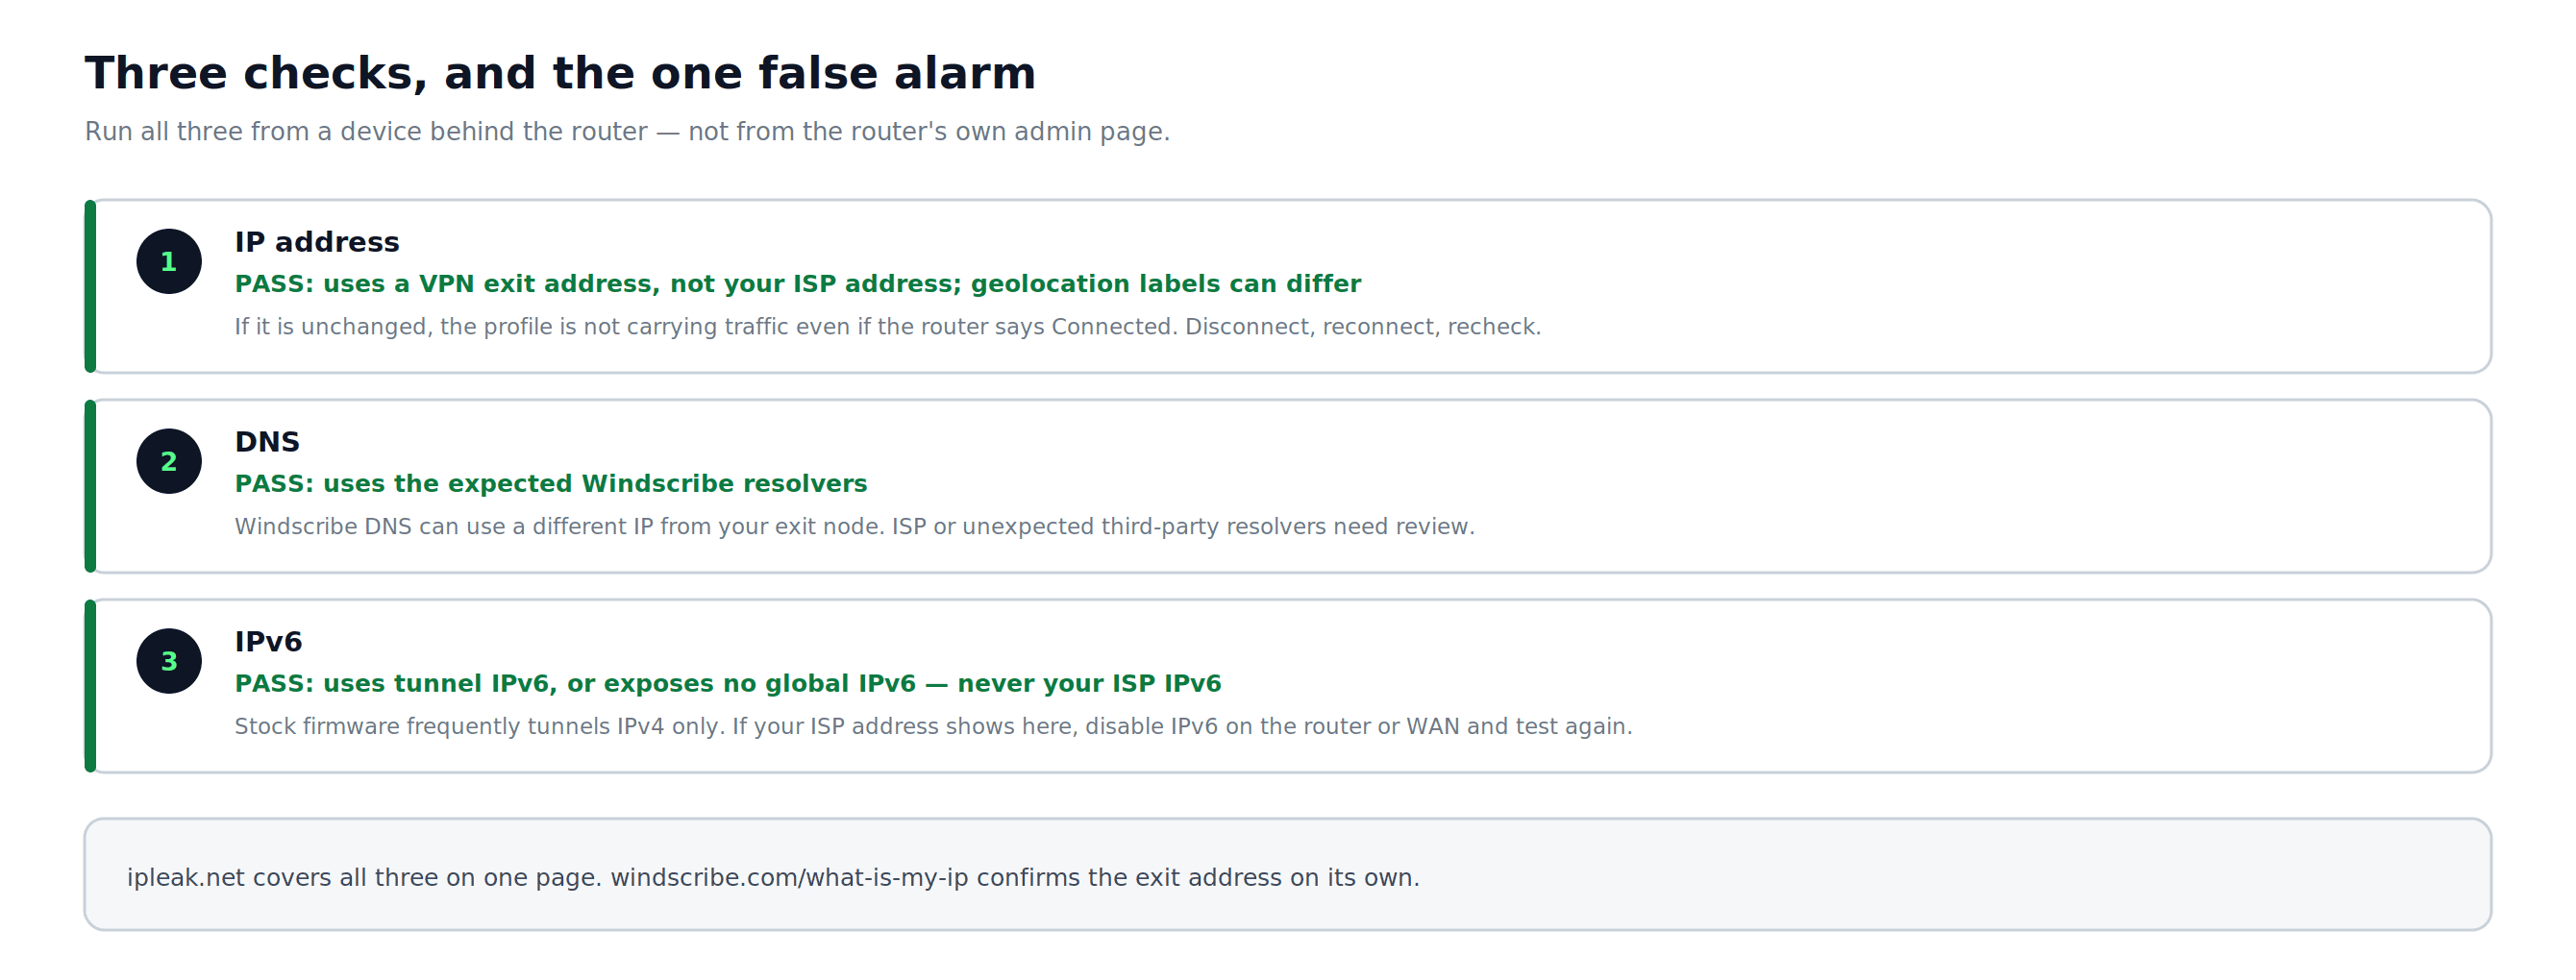
Figure 10: The three verification checks, including the DNS result that may look different from the VPN exit without being a leak.
Troubleshooting
Connection fails to establish:
- Confirm you are using your Windscribe OpenVPN username and password from the Config Generator, not your main Windscribe account login.
- For OpenVPN, try switching protocols: download a new config with TCP instead of UDP, or vice versa.
- For WireGuard, check the port shown in the
Endpointfield. WireGuard is UDP-only, so some restricted networks may block or throttle it regardless of port. If 443 does not work, regenerate the config with another available port. If no UDP port works on that network, use OpenVPN over TCP instead.
Some devices appear to bypass the VPN:
- On routers that support an apply-to-all option, primary-network devices generally route through the tunnel, except for the cases noted above: guest networks, secondary access points, device-level VPNs or proxies, hardcoded DNS, or IPv6 traffic your router does not tunnel. On routers with VPN Fusion or device-level assignment, such as some ASUS and TP-Link models, individual devices may need to be explicitly assigned to the VPN profile.
Speed is noticeably slower than expected:
- Choose a Windscribe server geographically closer to your physical location.
- For OpenVPN, switch from TCP to UDP if you have not already.
- WireGuard usually performs better than OpenVPN on the same router hardware, but actual speeds depend heavily on router CPU, firmware, and whether the router has VPN acceleration.
OpenVPN fails with TLS, certificate, or authentication errors:
- Check that the router's date and time are set correctly. VPN handshakes can fail if the router clock is wrong. Most router admin panels have a time or NTP settings page under Administration or Advanced Settings.
The VPN tunnel drops after a period of inactivity:
- Some routers disconnect idle VPN sessions. Look for a Keep Alive or Reconnect on Disconnect option in the VPN client settings and enable it if your exact firmware provides one.
- For WireGuard, a persistent keepalive value of 25 seconds is a common setting that prevents NAT timeouts. This field may appear in your router's WireGuard peer configuration.
The tunnel connects but websites hang or large pages fail to load:
- Try lowering the VPN MTU in small steps from the default. Common troubleshooting values are around 1400 for OpenVPN and 1380 for WireGuard, if your router exposes this setting. Not all stock firmware does.
This router sits behind an ISP gateway or another router:
- The VPN client only protects devices that use this router as their gateway. If your ISP gateway is also broadcasting Wi-Fi, devices connected to that Wi-Fi will not use the Windscribe router's VPN. Connect protected devices to the Windscribe router, or put the ISP gateway in bridge or modem-only mode if supported.
The router admin menu differs from this guide:
- Option names and locations vary by model and firmware version. Visit the Windscribe Help Center with your exact router model and firmware version.
Notes on Windscribe Features at the Router Level
- Split Tunneling: Windscribe's app Split Tunneling is not available when the VPN runs on stock router firmware. Router policy routing or per-device assignment may provide similar routing controls. To use Windscribe's per-app Split Tunneling, install the Windscribe app directly on the device.
- Firewall protection: Windscribe's app Firewall does not transfer to router-level configs. A router may have its own kill switch. Enable and test it by disconnecting the VPN and confirming that traffic is blocked rather than falling back to the ISP.
- R.O.B.E.R.T.: R.O.B.E.R.T. can filter DNS requests only when those requests go through Windscribe DNS over the VPN tunnel. Devices with hardcoded DNS or DNS over HTTPS may bypass router DNS.
- Static IPs: Static IPs work with router setups. Purchasing one requires an eligible paid plan; Build-A-Plan also requires the Unlimited Bandwidth and R.O.B.E.R.T. add-on. Static IPs are yearly add-ons. After purchasing, return to the Config Generator and select the Static IP location to generate the matching OpenVPN or WireGuard config.
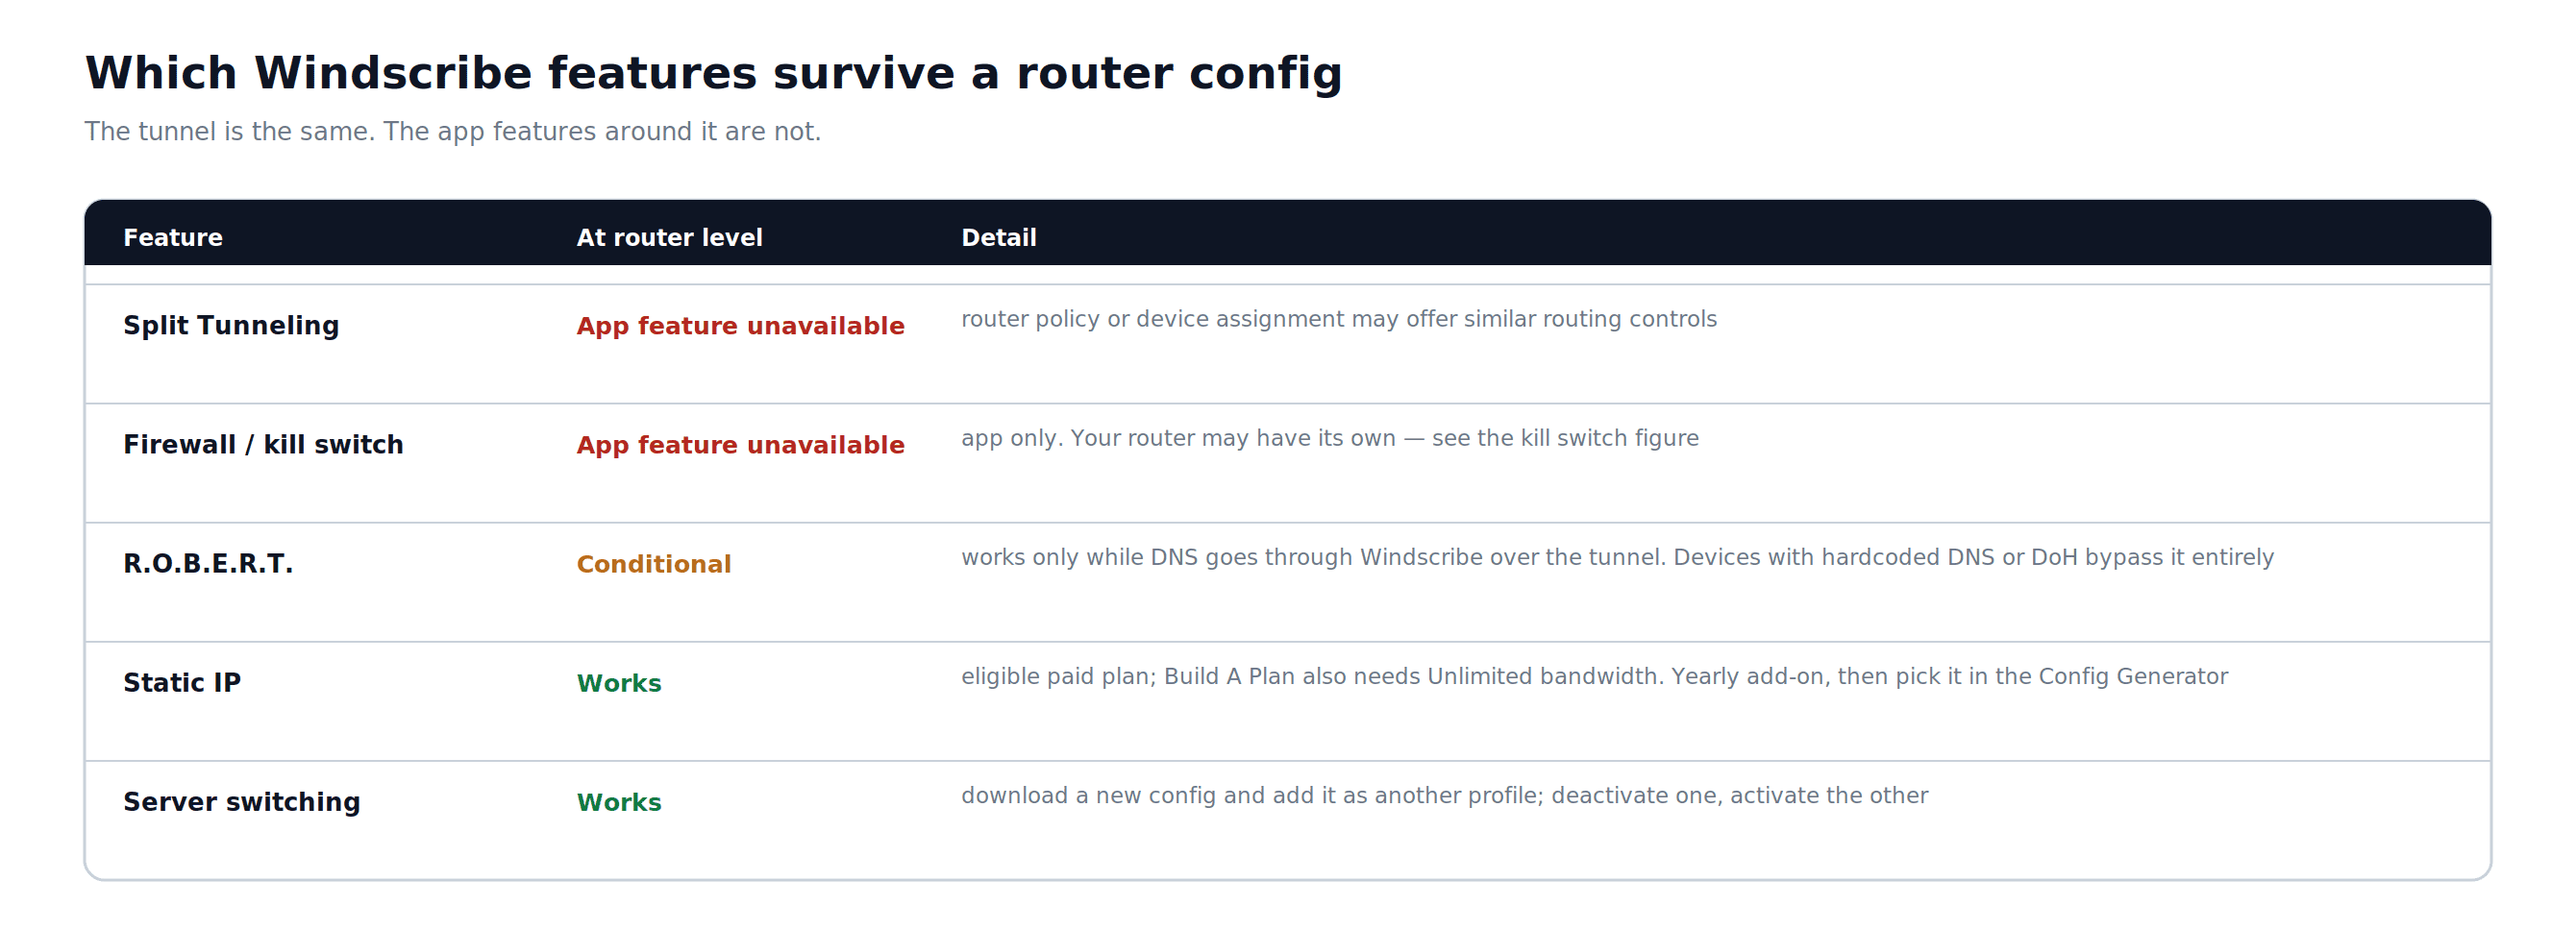
Figure 11: Which Windscribe features carry over to a router config and which stay app-only.
Frequently Asked Questions
Do I need a paid Windscribe account to set up VPN on my router?


Can I change server locations without redoing the full setup?
Will the VPN slow down my internet connection?
Do devices on my router need the Windscribe app installed?
What if my router does not support VPN client mode?
Windscribe Plans & Pricing
Router setup requires a paid Windscribe plan. Pro gives config access for all Windscribe locations. Build-A-Plan gives config access only for the locations included in your plan. For current plan details and pricing, see the Windscribe upgrade page.
“WireGuard” is a registered trademark of Jason A. Donenfeld. See Windscribe's Open Source Software Attributions.