

How to Set Up & Use Windscribe on a Linksys Router


Before You Start
Check each item before proceeding:
- A paid Windscribe Pro or Build-A-Plan account (config file generation is not available on free accounts)
- Your exact Linksys router model and hardware revision (printed on the label on the underside of the router)
- Access to the Windscribe config generator (log in at windscribe.com before starting)
- A backup of your current router settings (DD-WRT: Administration → Backup; WRT32X stock: Administration → Backup & Restore)
- The latest available DD-WRT build for your model, if you are using DD-WRT
Overview & Account Requirements
Installing Windscribe at the router level routes traffic from every device connected through that router through the encrypted VPN tunnel automatically, including smart TVs, game consoles, and any other device that cannot run a VPN app on its own.
Config generator pages:
- OpenVPN: windscribe.com/getconfig/openvpn
- WireGuard: windscribe.com/getconfig/wireguard
Compatibility & Setup Path
Use this decision tree to find the correct section for your situation:
- WRT32X on stock Linksys firmware? → Go to Part 1 (OpenVPN)
- WRT1900AC, WRT1900ACS, or WRT3200ACM on stock Linksys firmware? → Stop. Stock firmware on these models does not include an outbound VPN client. Flash DD-WRT first (see the Flashing DD-WRT section), then return below.
- Running DD-WRT and want OpenVPN? → Use Part 2 (applies to all DD-WRT builds)
- Running DD-WRT with a current build and want WireGuard? → Use Part 3 (recommended). A current build will show an Import Configuration button under Setup → Tunnels.
- Running DD-WRT with an older build and want WireGuard? → Use Part 4 (manual). Older builds do not show the Import Configuration button.
Scope of this guide: The steps below cover the WRT32X, WRT1900AC, WRT1900ACS, and WRT3200ACM only. If you have a Linksys Velop, EA-series, MR-series, or a Linksys business router, this guide does not apply to your device.
Firmware note: Of the Linksys WRT models covered in this guide, the WRT32X is the only one expected to expose a stock-firmware OpenVPN client. The WRT1900AC, WRT1900ACS, and WRT3200ACM stock firmware generally provide OpenVPN server and remote-access features, not an outbound VPN client for connecting to a service like Windscribe.
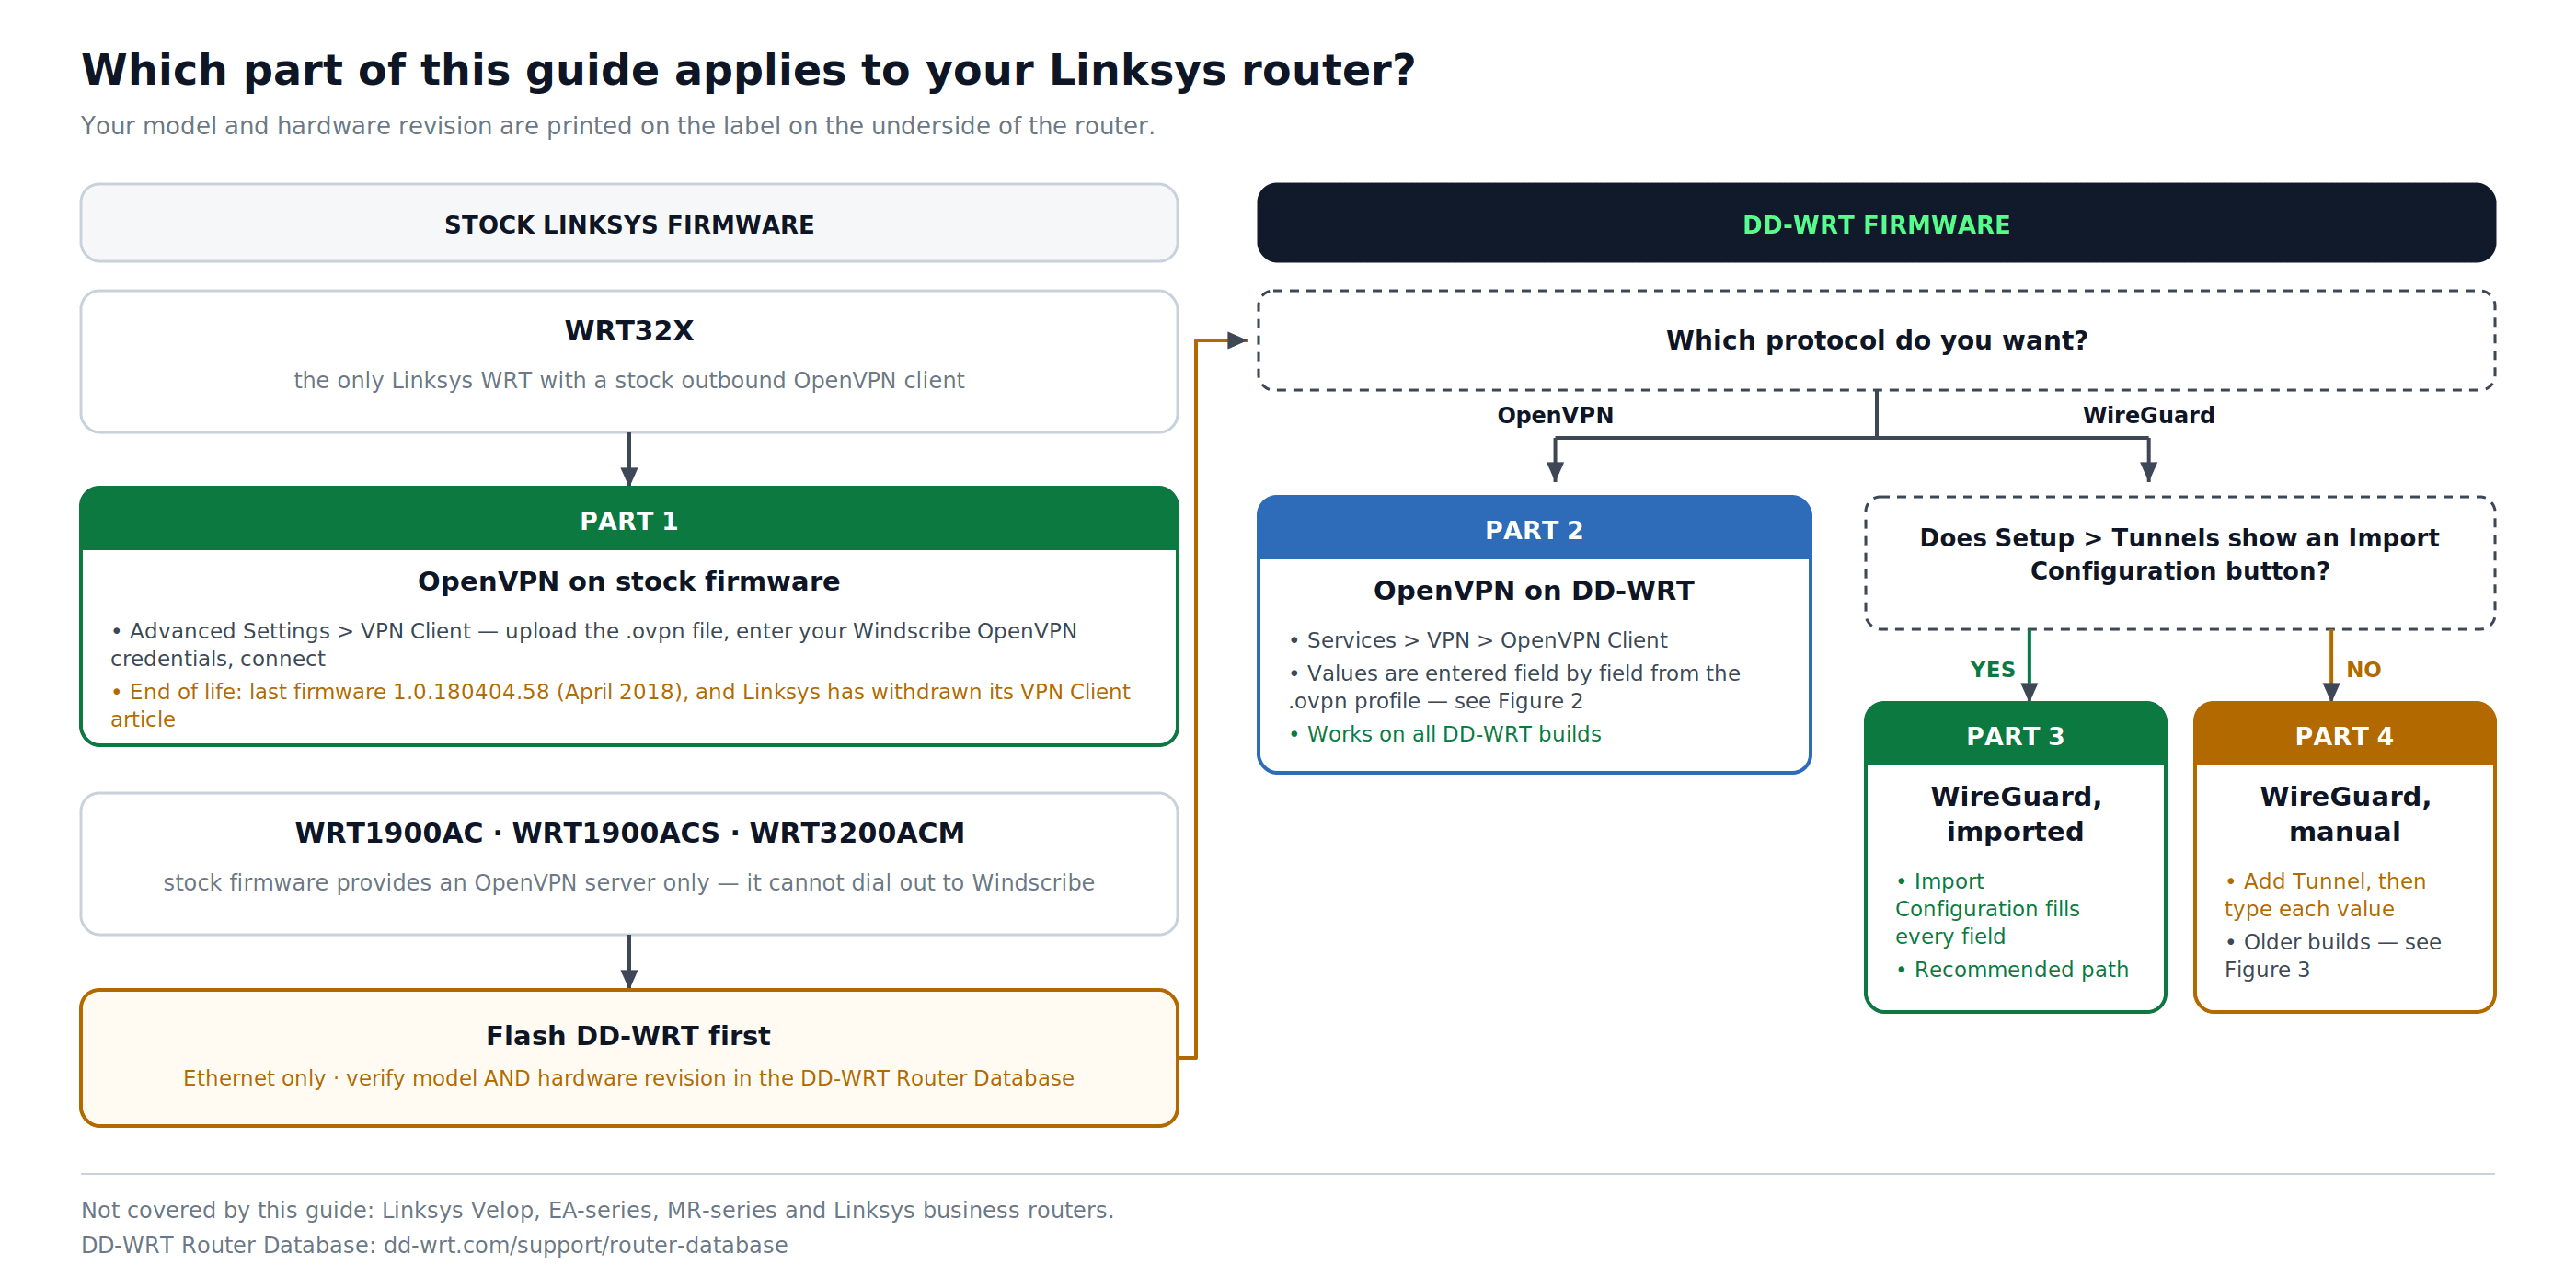
Figure 1: Which part of the guide applies to your model and firmware, and where flashing DD-WRT fits in.
Flashing DD-WRT (WRT1900AC, WRT1900ACS, WRT3200ACM Users)
Flashing third-party firmware may void your warranty or affect Linksys support eligibility. An incorrect or interrupted flash can permanently brick the device.
Before flashing:
- Use an Ethernet connection to the router during the flash. Flashing over Wi-Fi risks an interrupted transfer and a bricked device.
- Confirm your exact model and hardware revision in the DD-WRT Router Database. Do not flash a build intended for a different hardware revision.
- Follow the firmware vendor's instructions exactly for your model.
- Once DD-WRT is installed, return to Part 2, 3, or 4 below.
Part 1: OpenVPN Setup (WRT32X, Stock Firmware)
Step 1: Download the OpenVPN Profile & Get Credentials
- Log in at windscribe.com, then go to the OpenVPN config generator (or navigate directly to My Account → Config Generator).
- Configure the following:
- Location: Select the server location you want to connect to.
- Protocol: UDP is recommended for speed. Use TCP if UDP is blocked or unstable on your network.
- Port: Use 443 if you are unsure.
- OpenVPN Version: Choose the newest version supported by your router firmware.
- Click Download Config to save one
.ovpnprofile. The profile contains the CA certificate and TLS-auth key in embedded<ca>and<tls-auth>blocks. - On the same page, click Get Credentials. Copy the OpenVPN Username and OpenVPN Password. These are OpenVPN-specific credentials and are separate from your Windscribe account login email and password.
One config file, one location. Each config file is tied to one server location. Download a separate config file for each location you may want to use. Only one tunnel can be active on the router at a time.
Step 2: Access the WRT32X Admin Panel
- Connect a device to your router over Wi-Fi or Ethernet.
- Open a browser and navigate to http://192.168.1.1 or http://myrouter.local. If neither loads, check the router label for the correct address.
- Log in with your router admin credentials. Use the password you set during initial setup. If you never changed it, check the label on the underside of the router or the Linksys documentation for your exact model.
Step 3: Navigate to the VPN Client
- In the left sidebar, click Advanced Settings.
- Click VPN Client.
Step 4: Import the Config File & Connect
- Under OpenVPN Client, click Choose File.
- Select the
.ovpnfile downloaded in Step 1 and click Open. - In the Username field, enter your Windscribe OpenVPN Username from Step 1.
- In the Password field, enter your Windscribe OpenVPN Password from Step 1.
- Click Connect.
Step 5: Verify the Connection
After connecting, follow the steps in the Verifying Your Connection section below.
Part 2: OpenVPN Setup (DD-WRT Firmware)
This setup is based on Windscribe's DD-WRT OpenVPN setup flow. DD-WRT's OpenVPN client requires entering individual values extracted from the config files rather than importing a single file.
Step 1: Download the OpenVPN Profile & Get Credentials
- Log in at windscribe.com, then go to the OpenVPN config generator.
- Select Location / IP, Protocol, Port, and the newest OpenVPN Version supported by your DD-WRT build.
- Click Download Config to save one
.ovpnprofile. Keep the file open: it contains the connection directives plus embedded<ca>and<tls-auth>blocks. - Click Get Credentials and copy your OpenVPN Username and OpenVPN Password. These are separate from your Windscribe login credentials.
Step 2: Extract the Server Details from the Config File
- Open the .ovpn file using a plain-text editor (Notepad on Windows; on macOS, open TextEdit, then choose Format → Make Plain Text before opening the file to avoid rich-text formatting issues).
- Locate the line that begins with
remote. It will read:remote [hostname] [port]
- Copy the full hostname exactly as it appears. This is your Server IP/Name. The number following the hostname is your Port. Do not modify or abbreviate the hostname.
Keep this file open: you will need it again in Step 4.
Step 3: Open the DD-WRT OpenVPN Client
- Open a browser and navigate to http://192.168.1.1 (or the LAN IP your DD-WRT router uses if it differs).
- Click the Services tab at the top, then click the VPN sub-tab.
- Scroll to OpenVPN Client.
- Set Start OpenVPN Client to Enable. The full configuration form will appear.
Step 4: Enter the OpenVPN Settings
Fill in the following fields using the values from your config file and credentials. Leave all fields not listed here at their default values.
| Field | Value |
|---|---|
| Server IP/Name | Copy the full hostname exactly from the remote line of your .ovpn file |
| Port | Copy the port number exactly from the remote line of your .ovpn file |
| Tunnel Device | TUN |
| Tunnel Protocol | UDP or TCP (match the protocol you selected when generating the config) |
| Encryption Cipher | Copy the cipher value from your generated profile. Current 2.4.6+ profiles use AES-256-GCM; older profiles use AES-256-CBC. |
| Hash Algorithm | Copy the auth value from your generated profile (SHA512 in current profiles). |
| User Pass Authentication | Enable |
| Username | Your Windscribe OpenVPN Username (from Step 1) |
| Password | Your Windscribe OpenVPN Password (from Step 1) |
| Advanced Options | Enable |
| TLS Cipher | None |
| LZO Compression | No |
| NAT | Enable |
| Firewall Protection | Enable |
| IP Address | Leave blank |
| Subnet Mask | Leave blank |
| Tunnel MTU Setting | 1500 |
| Tunnel UDP Fragment | Leave blank |
| Tunnel UDP MSS-Fix | Disabled (enable only if your ISP requires it) |
| nsCertType verification | Checked, if present in your DD-WRT build |
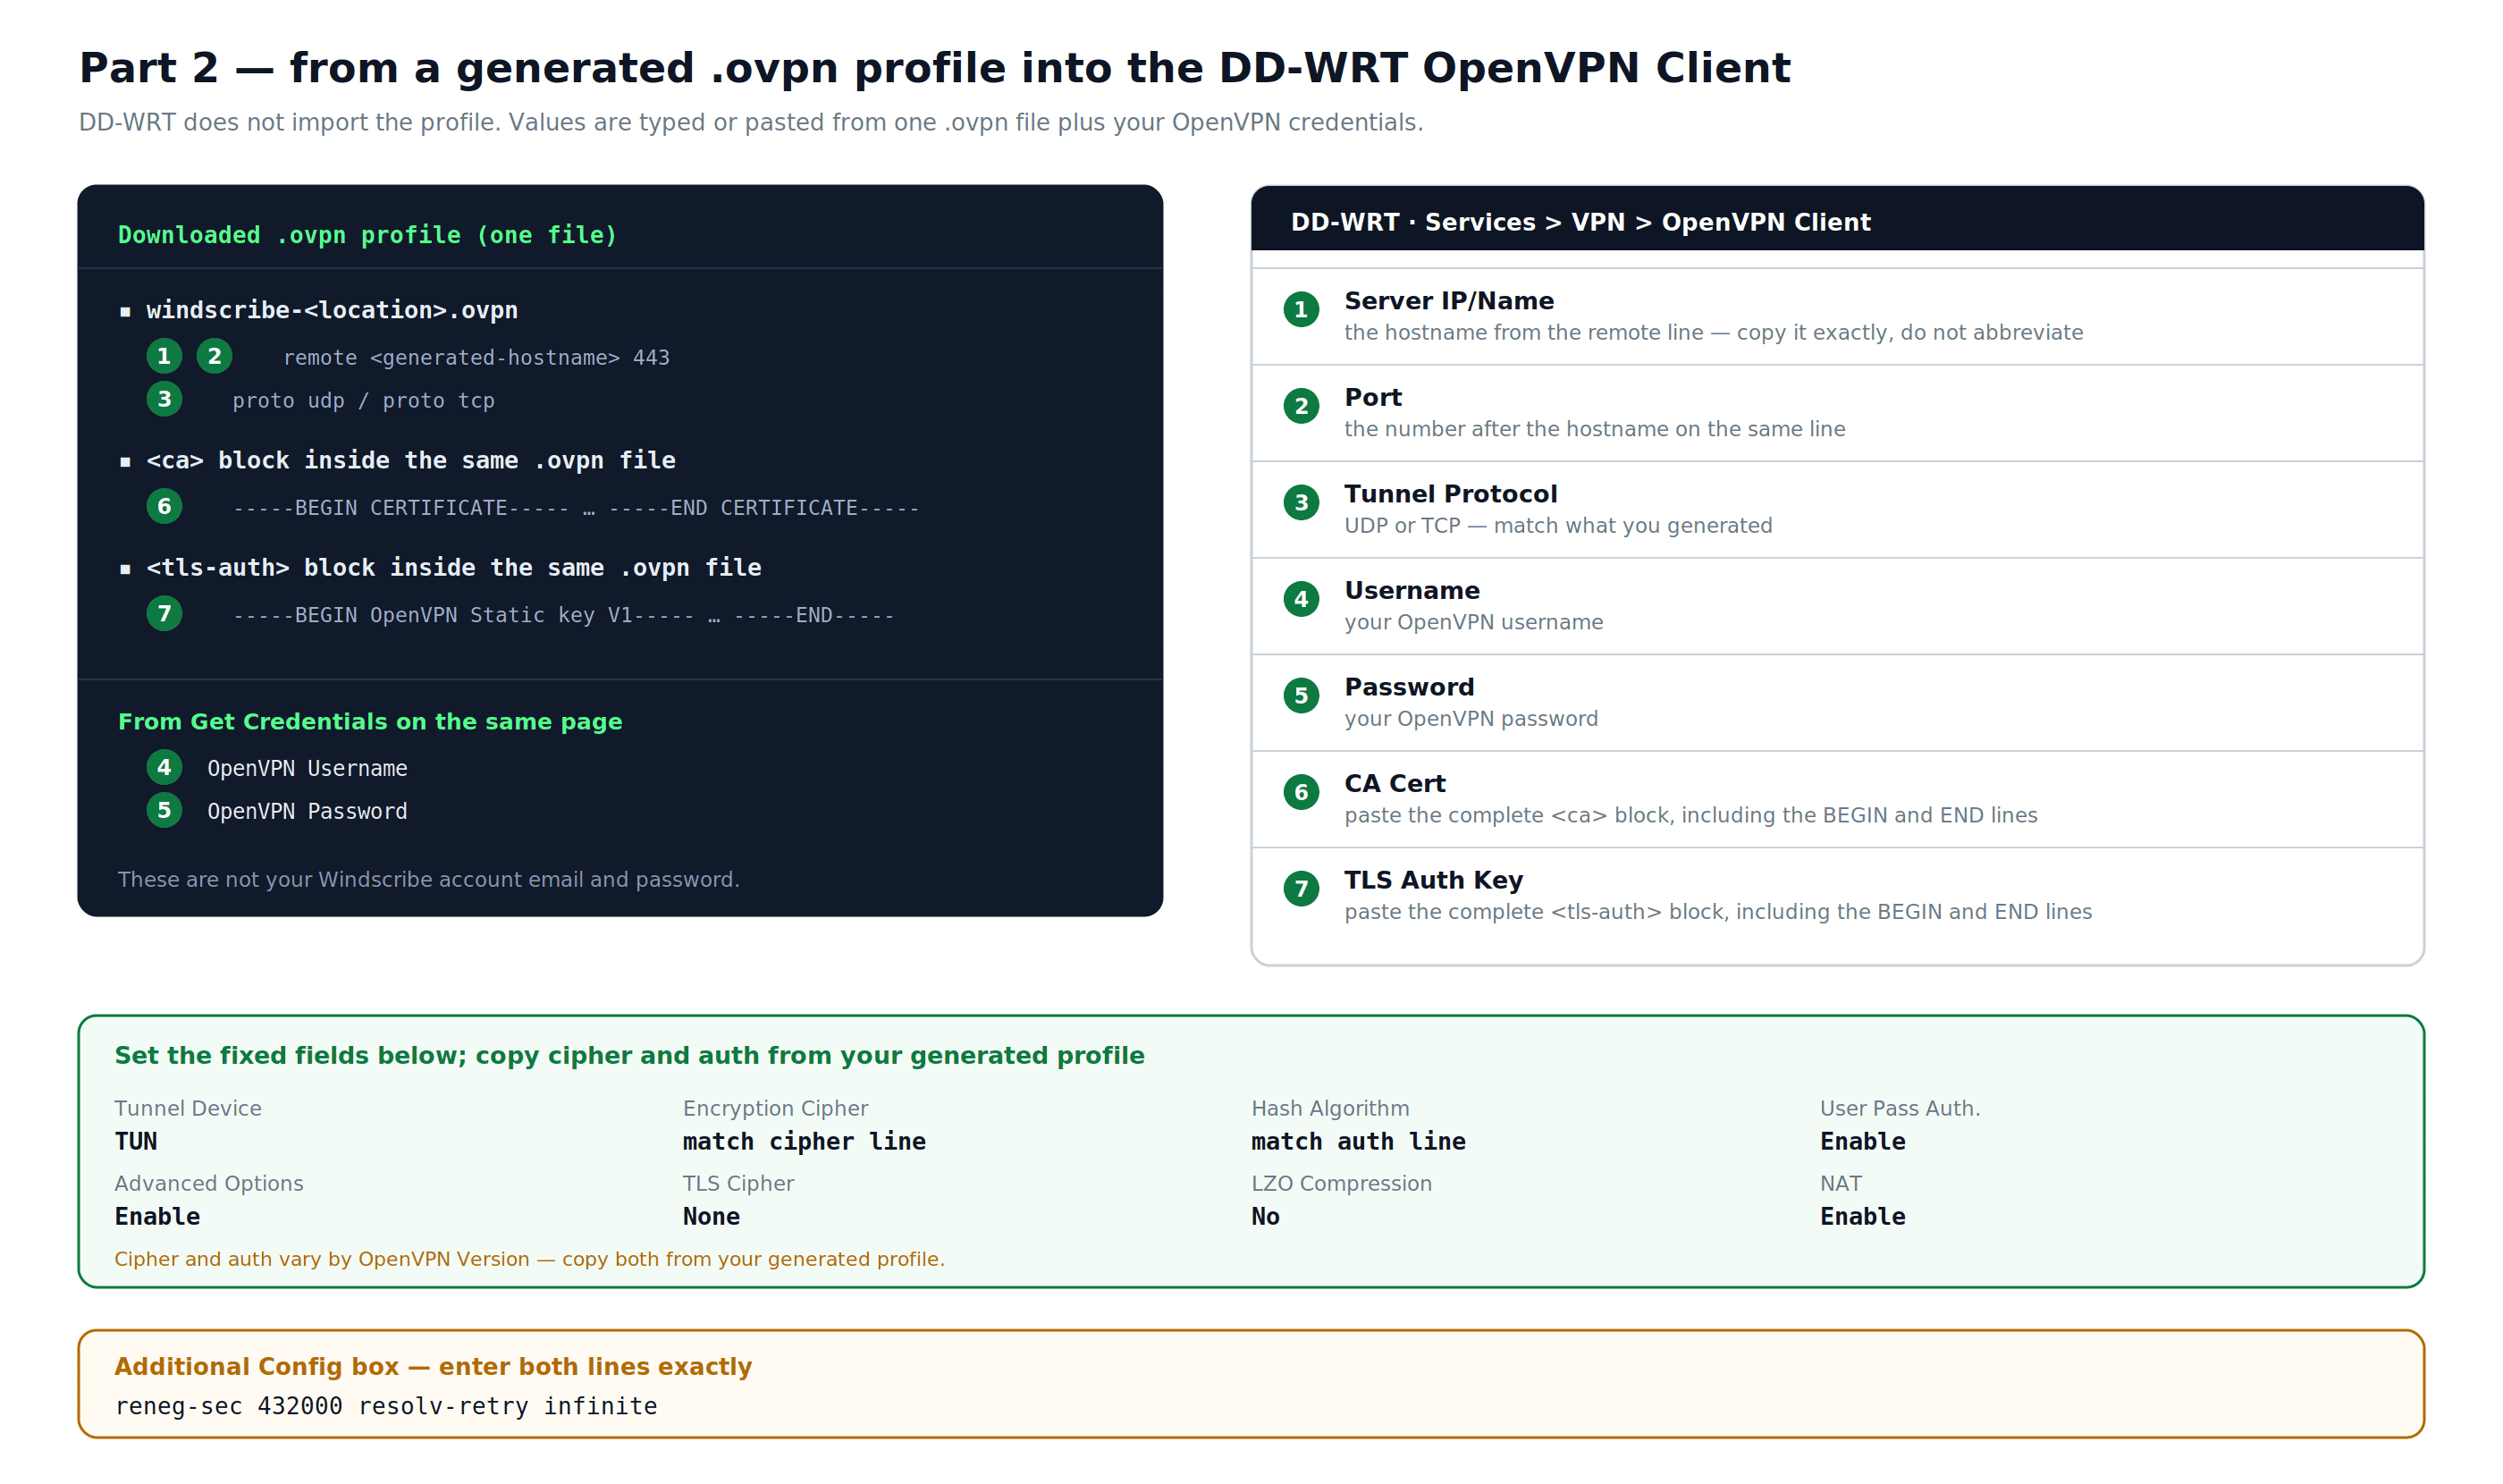
Figure 2: Part 2 — which value from the generated .ovpn profile goes in which DD-WRT OpenVPN Client field, plus the settings that are always fixed.
Step 5: Enter the Certificates & Additional Config
TLS Auth Key: In the generated .ovpn file, copy everything inside the <tls-auth> block, including the BEGIN and END lines, and paste it into the TLS Auth Key field.
Additional Config: Enter the following directives exactly as shown in the Additional Config field:
reneg-sec 432000
resolv-retry infinite
CA Cert: In the generated .ovpn file, copy everything inside the <ca> block, including the BEGIN and END lines, and paste it into the CA Cert field.
If the Username and Password fields are not visible in your version of DD-WRT, your build is older and requires a workaround. Search for "DD-WRT" in the Windscribe knowledge base to find the current DD-WRT OpenVPN guide, which includes the appendix for this scenario. Updating to a current DD-WRT build is recommended.
Step 6: Save & Apply
- Click Save at the bottom of the page.
- After the page refreshes, click Apply Settings.
- Confirm the connection at Status → OpenVPN: the State field should read CONNECTED SUCCESS or an equivalent connected status. Then follow the Verifying Your Connection steps below.
Step 7: Back Up Your Settings
Navigate to Administration → Backup. Click Backup to save a file named nvrambak.bin to your computer. This file can be used to restore your configuration if the router is reset.
Part 3: WireGuard Setup on DD-WRT (Current Firmware, Recommended)
This is Windscribe's recommended method for current DD-WRT builds. It uses the Import Configuration feature, which populates all tunnel fields automatically from the downloaded config file.
If you do not see an Import Configuration button in Step 3 below, your DD-WRT build is older. Use Part 4 instead.
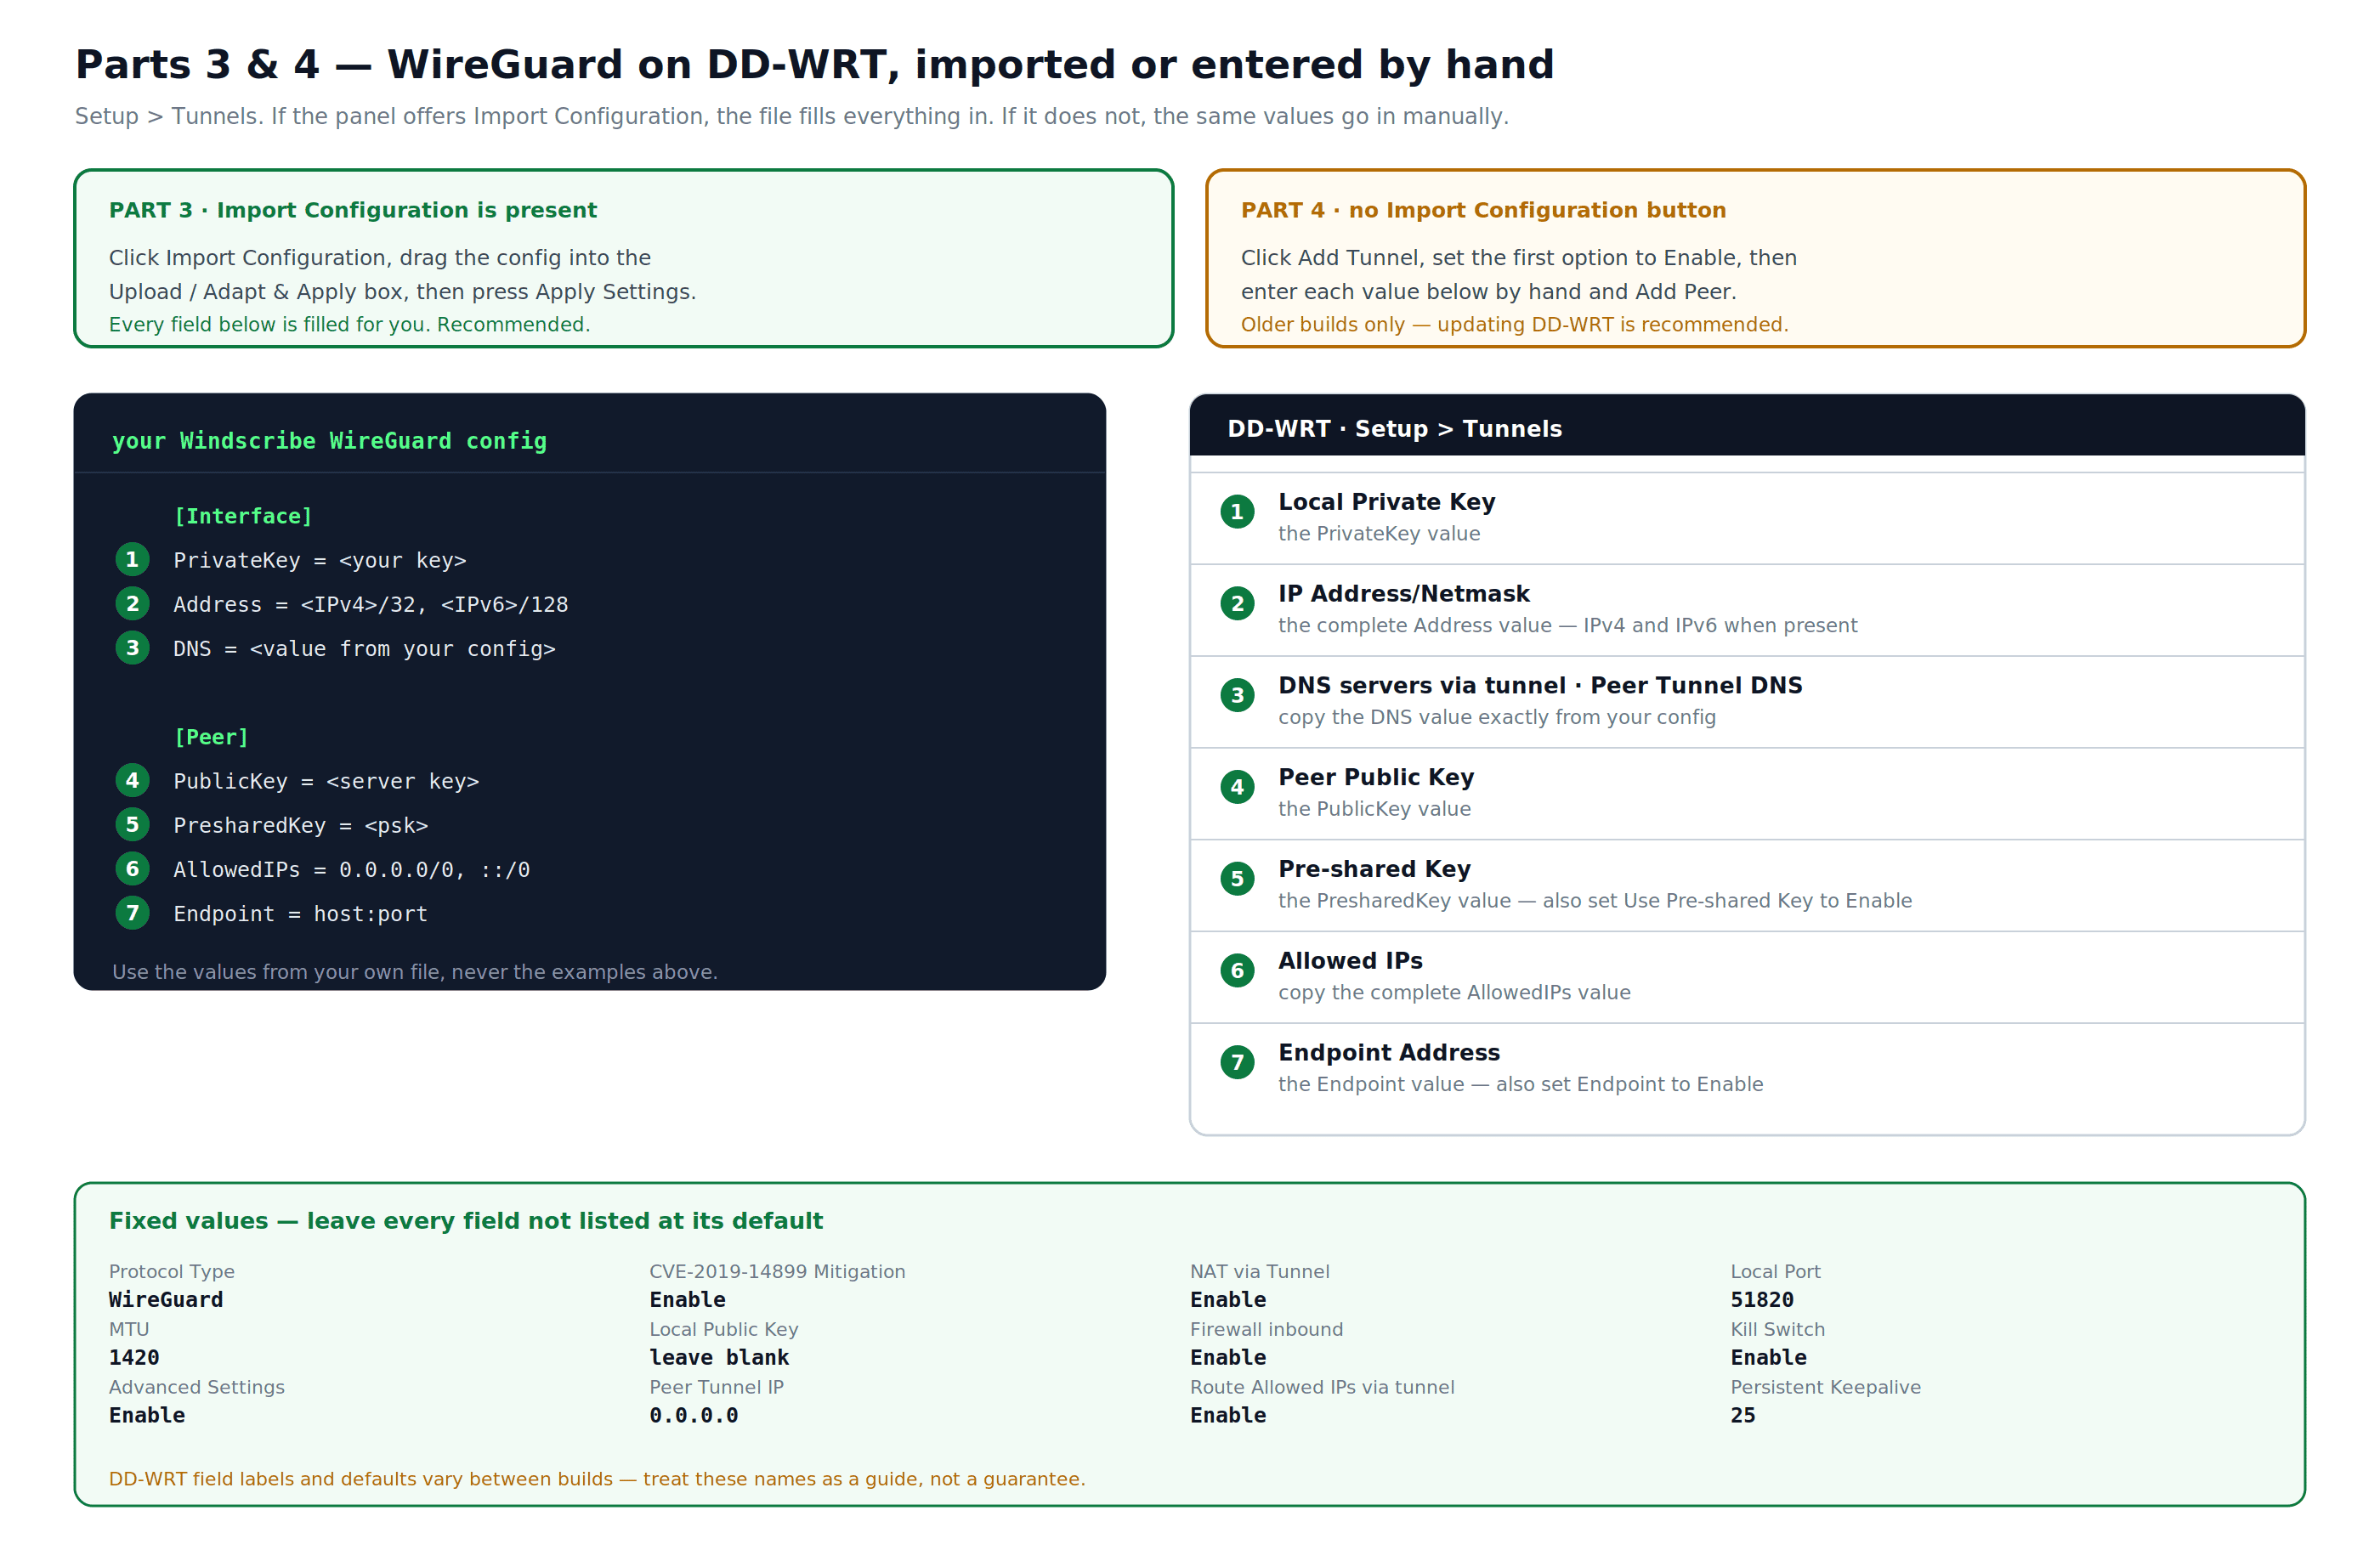
Figure 3: Parts 3 and 4 — the import-or-manual fork, and the WireGuard config values behind every DD-WRT tunnel field.
Step 1: Download the WireGuard Config
- Log in at windscribe.com, then go to the WireGuard config generator.
- Select a Location and Port (use 443 if unsure).
- Under Key Pair, leave New Key Pair selected for a new router setup, or select an existing key pair you intentionally want to reuse.
- Click Download Config. A new key pair is created as part of the download when New Key Pair is selected.
Step 2: Open the DD-WRT Tunnels Panel
- In a browser, go to http://192.168.1.1 (or the LAN IP your router uses if it differs).
- Click the Setup tab, then click the Tunnels sub-tab.
Step 3: Import the Config
- Click Import Configuration.
- Drag your downloaded Windscribe config file into the Upload / Adapt & Apply box.
- All fields will populate automatically.
Step 4: Apply Settings
Press Apply Settings at the bottom. Before considering setup complete, also complete the Verify IPv6 and DNS Routing step and the Verifying Your Connection steps below.
Part 4: WireGuard Setup on DD-WRT (Older Firmware, Manual)
Use this method if your DD-WRT build does not show an Import Configuration button. Windscribe recommends updating to the latest DD-WRT build for your model before proceeding: dd-wrt.com/support/router-database/
Note: DD-WRT field labels, field availability, and default values vary between builds. The table below reflects the current DD-WRT WireGuard setup flow, but your build may label or arrange some fields differently. Use the field names below as a guide, not a guarantee.
Step 1: Download & Read the WireGuard Config File
- Log in at windscribe.com, then go to the WireGuard config generator.
- Select a Location and Port (use 443 if unsure). Under Key Pair, leave New Key Pair selected for a new setup, then click Download Config. The key pair is created as part of the download.
- Open the downloaded file in a plain-text editor. You will copy specific values from this file into DD-WRT in the steps below. Do not use example values from this guide: use the actual values from your own file.
Step 2: Open the DD-WRT Tunnels Panel & Add a Tunnel
- In a browser, go to http://192.168.1.1 (or the LAN IP your router uses if it differs).
- Click the Setup tab, then click the Tunnels sub-tab.
- Click Add Tunnel.
- Set the first option to Enable.
Step 3: Configure the Tunnel Settings
Enter the following values. Leave all fields not listed here at their defaults.
| Field | Value |
|---|---|
| Protocol Type | WireGuard |
| CVE-2019-14899 Mitigation | Enable |
| NAT via Tunnel | Enable |
| Local Port | Leave as default (51820) |
| MTU | 1420 |
| Local Public Key | Leave blank |
| DNS servers via tunnel | Copy the DNS value exactly from your config file. It is account/config-derived and is reachable through the tunnel. |
| Firewall inbound | Enable |
| Kill Switch | Enable |
| Advanced Settings | Enable |
| Local Private Key | Copy the PrivateKey value from your config file |
Step 4: Add the Peer
- Click Add Peer. Peer options will appear below.
- (Optional) Enter a name for this connection, such as the server location, for easy identification later.
| Field | Value |
|---|---|
| Peer Tunnel IP | 0.0.0.0 (verify this matches your DD-WRT build's expected peer IP field) |
| Peer Tunnel DNS | Copy the DNS value from your config file |
| Endpoint | Enable |
| Endpoint Address | Copy the Endpoint value from your config file. Some DD-WRT builds show a single combined host:port field; others split host and port into separate fields. Check your UI and enter accordingly. |
| Allowed IPs | Copy the complete AllowedIPs value from your config file. Current permanent configs use 0.0.0.0/0, ::/0. |
| Route Allowed IPs via tunnel | Enable |
| Persistent Keepalive | 25 |
| Peer Public Key | Copy the PublicKey value from your config file |
| Use Pre-shared Key | Enable |
| Pre-shared Key | Copy the PresharedKey value from your config file |
Step 5: Set the IP Address
At the bottom of the tunnel configuration:
| Field | Value |
|---|---|
| IP Address/Netmask | Copy the complete Address value from your config file. Current configs can contain both an IPv4 and IPv6 address. If your DD-WRT build exposes separate fields, enter each value in its matching field. |
Step 6: Apply Settings
Click Apply Settings at the bottom. Then complete the Verify IPv6 and DNS Routing step and Verifying Your Connection steps below.
Verify IPv6 and DNS Routing on DD-WRT
Current Windscribe WireGuard configs include both IPv4 and IPv6 routes when available. Use the complete Address, DNS, and AllowedIPs values from your downloaded config rather than copying examples from this guide. This check applies to both Part 3 and Part 4.
- Apply the tunnel settings, then run IPv4, IPv6, and DNS leak tests from a device behind the router.
- If your DD-WRT build cannot accept the generated IPv6 address and
::/0route, or the leak test shows your normal ISP IPv6 address, open Setup > IPv6 and set IPv6 to Disabled. - Click Apply Settings, then repeat the leak tests before relying on the tunnel.
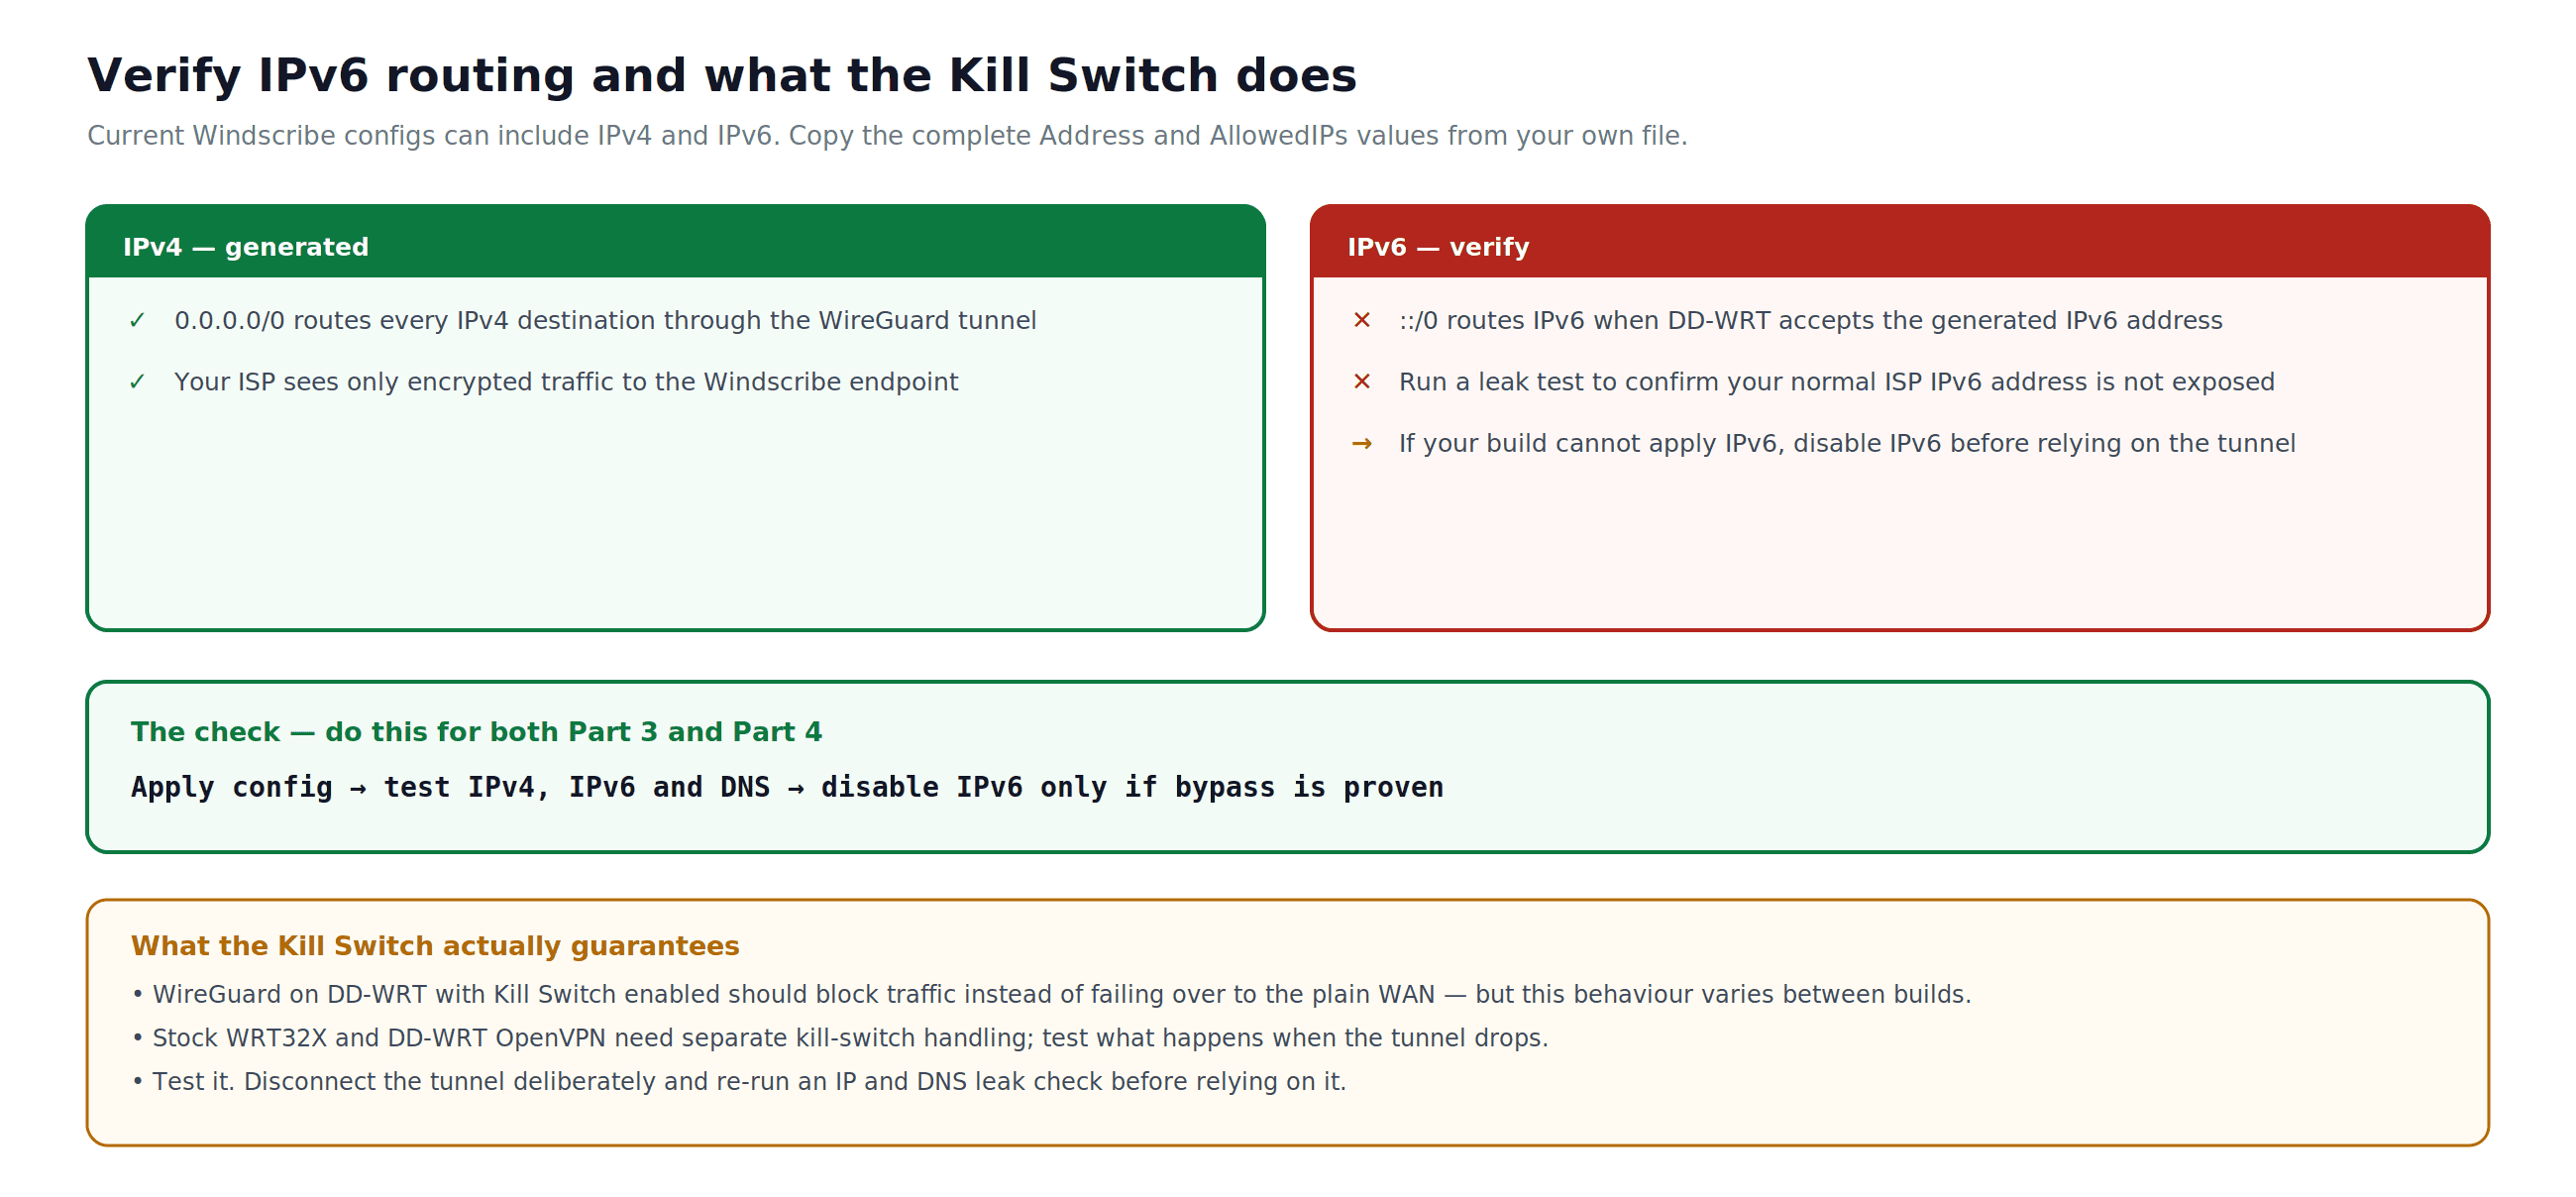
Figure 4: How to verify the generated dual-stack routes and what the Kill Switch does and does not promise.
Verifying Your Connection
After completing any setup in this guide:
- On any device connected through the router, visit windscribe.com. The homepage shows your current public IP and detected location. If it shows the Windscribe server location rather than your actual location, the tunnel is active.
- Run a DNS leak test at ipleak.net. No entries from your ISP or local network should appear. If they do, see the Troubleshooting section.
- For WireGuard setups, check the peer's WireGuard Status section in DD-WRT (Setup → Tunnels). An active connection shows a recent handshake timestamp and transfer data.
Switching Server Locations
WRT32X (Stock Firmware, OpenVPN)
Download a new config file for the target location from the OpenVPN config generator and repeat the import process in Part 1, Step 4. Switching locations requires loading a different config file.
DD-WRT (OpenVPN)
The safest approach is to download a new config file for the target location from the OpenVPN config generator and update the Server IP/Name, Port, and Tunnel Protocol fields to match the values in the new config. Also update the TLS Auth Key and CA Cert if the new config file uses different certificate material. Confirm all changed values in the new .ovpn file before assuming they match your current settings. Click Save, then Apply Settings.
DD-WRT (WireGuard)
Each WireGuard config file is tied to a specific server location and key pair. To switch locations, generate a new config file from the WireGuard config generator for the target location. Use Import Configuration on current DD-WRT builds, or update each affected field manually on older builds. Importing a new config will overwrite the existing tunnel.
Troubleshooting
Tunnel will not connect: Check that your OpenVPN Username and Password or WireGuard keys came from the config generator, not your Windscribe account login. For DD-WRT OpenVPN, confirm the hostname and port are copied exactly from the remote line in the .ovpn file, and that the CA Cert and TLS Auth Key were pasted in full including header and footer lines. If the Username and Password fields are absent in DD-WRT, search for the DD-WRT guide in the Windscribe knowledge base for the legacy credential workaround. For WireGuard, confirm all key fields match the config file exactly with no extra spaces or line breaks.
Connected, but real IP or original location still showing: On DD-WRT, confirm Kill Switch is Enabled in the WireGuard tunnel settings, or confirm the OpenVPN client is set to redirect all traffic through the tunnel. Restart the router after the first-time connection.
DNS leak detected at ipleak.net: Ensure DNS queries are routed through the tunnel. On DD-WRT, one approach is to set a static DNS under Setup → Basic Setup → Network Address Server Settings to your Windscribe tunnel DNS, but exact DNS handling varies by build and setup. For WireGuard, the tunnel DNS is the DNS value in your config file; copy it exactly rather than using a value from an example. Run a leak test after any DNS change to confirm. Also complete the Verify IPv6 and DNS Routing section above; disable IPv6 only when your build cannot apply the generated IPv6 route or testing proves bypass.
Slow speeds: Switch to a geographically closer server. Prefer WireGuard over OpenVPN for throughput, and UDP over TCP unless UDP is blocked on your network. TCP on port 443 may help on restrictive networks, but it is not a substitute for Windscribe's app-based Stealth or WStunnel modes.
What Router Setup Does Not Include
Router-level VPN config does not replicate the full Windscribe app experience on individual devices:
- No per-device app Firewall or kill switch
- No Windscribe app-style Split Tunneling. DD-WRT policy-based routing is possible for advanced users, but it is outside the scope of this guide.
- No in-app protocol or location switching per device
- No Emergency Connect or MAC address spoofing
- R.O.B.E.R.T. works only when the router is routing DNS through the Windscribe tunnel; manage block lists at windscribe.com/myaccount/security/blocking-categories
- Static IPs are shared with a small group of users. Windscribe does not offer dedicated IPs. If you have the Static IP add-on on an eligible paid plan, download a Static IP config from the config generator and follow the same setup steps.
For any of these controls on a specific device, run the Windscribe app on that device directly.
Frequently Asked Questions
Do I need a paid Windscribe account to set up a VPN on my router?
Yes. The OpenVPN and WireGuard config generators are available to Pro and Build-A-Plan subscribers only. A free account cannot generate config files and cannot be used for router-level setup.
Will a router-level VPN slow down my internet?
Some performance reduction is expected. The router's processor handles encryption for every connected device, and consumer routers have less processing power than a desktop or phone. WireGuard has lower overhead than OpenVPN and typically delivers better throughput at the router level. The actual impact depends on your router model, connection speed, and the distance to the server location you connect to.
Can I run the Windscribe app on a device that is also connected through the router VPN?
Technically yes, but this creates a double-VPN setup on that device. If you need app-level features like Split Tunneling, protocol switching, or Emergency Connect, it is usually cleaner to run the Windscribe app directly on that device instead of relying on the router tunnel for that device. Advanced users can also use DD-WRT policy-based routing to exclude specific devices from the router tunnel, but that is outside the scope of this guide.
What happens if the VPN connection drops?
For DD-WRT WireGuard with Kill Switch enabled, traffic should be blocked rather than falling back to the unencrypted WAN connection, but this behavior can vary by DD-WRT build. Verify with IP and DNS leak tests after setup before relying on it. For stock WRT32X OpenVPN and DD-WRT OpenVPN without a separately configured kill switch, traffic may fall back to the regular WAN path if the tunnel drops. Run an IP and DNS leak test after setup to verify the behavior under normal conditions.
Does Windscribe log my activity?
No. Windscribe does not log browsing activity, DNS queries, connection logs, IP timestamps, or session logs. Windscribe does store limited account and service data, including last activity time and bandwidth used over a 30-day period, for plan limits and abuse prevention. See the full Windscribe Privacy Policy for complete details. This applies whether you connect through the Windscribe app or a manual router config.
Can I use one Windscribe account on my router and my other devices at the same time?
Yes. Windscribe allows unlimited simultaneous connections on a single account. You can run the router VPN for your home network while using the Windscribe app on your phone, laptop, or any other device concurrently. This is intended for your own devices and household use. Account sharing is prohibited.
Get Started with Windscribe
Router configuration requires an eligible paid Windscribe plan. Check the current plan options and pricing before generating a configuration.
Compare plans at windscribe.com/upgrade